
|
ebolt help much needed |
Post Reply 
|
| Author | |
ultmate98 
Member 

Fear the THUMB!! Joined: 25 February 2005 Location: United States Status: Offline Points: 721 |
 Post Options Post Options
") Thanks(0) Thanks(0)
 Quote Reply Quote Reply
 Topic: ebolt help much needed Topic: ebolt help much neededPosted: 24 December 2006 at 2:05pm |
|
i have an m98 ebolt board that i cant get to fire for anything. it stopped working a few days ago, but i got it to work again. ive had to re-soulder the board and the battery back on, due to a bad job from the first guy that that had this thing, and now its stopped again. anyone have any suggestions? sorry if i was unclear cause i had to type this in a hurry |
|
|
Warning: Exposure to the Son may prevent burning
 Christ Krew Christ Krew
|
|
 |
|
|
Simma Down!!
Platinum Member 

Joined: 10 June 2002 Location: United States Status: Offline Points: 3422 |
Post Options
Thanks(0)
Quote Reply
Posted: 24 December 2006 at 3:53pm |
|
Did you recheck your soldering job? Also check that you didnt crush the wires when you put the reciever halves back together. I have seen alot of crushed wires.
|
|
|
|
|
ultmate98
Member
Fear the THUMB!! Joined: 25 February 2005 Location: United States Status: Offline Points: 721 |
Post Options
Thanks(0)
Quote Reply
Posted: 24 December 2006 at 4:15pm |
|
i am going to re-recheck it and see if for some reason thats it. the wires are pinched, but it was like that when i got it and it did work, however, i can jump from the battery directly to the noid and it will fire, so its not in the wires themselves
|
|
|
Warning: Exposure to the Son may prevent burning
Christ Krew
|
|
|
|
|
Bruce A. Frank
Platinum Member

KRL Reincarnated? Joined: 27 March 2004 Location: United States Status: Offline Points: 3063 |
Post Options
Thanks(0)
Quote Reply
Posted: 29 December 2006 at 12:55am |
|
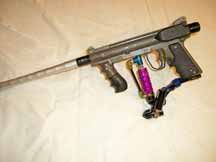
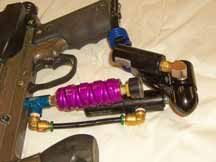
Jump from the battery directly to the solenoid? With what? the crushed wires? How is it that they were lose to connect directly to the solenoid? If you weren't using the crushed wires as the jumper, what assures you that they are okay? Point here is that the wires are pinched during assembly then they can be shorted to the frame of the marker. If you unbolt the shells and then it works may be the indication that those crushed wired are shorting when crushed between the frame halves. Let me make a point here, crushed wires are damaged. Two things can have happened. The insulation can be thinned to the point that there is now a short when the wires are only laying properly inside the frame. Or, if you screwed the shells together tightly enough(with the wires trapped in the corner of the frame) you can actually sever the conductor inside the wire while the plastic insulation remains intact. I have not had to repair a wire where it solders directly to the board, so I'll make a couple of suggestions. Use what best applies. Unsolder the wires from the board. Use, on a printed circuit board, only a fine point (pencil like) soldering tip on an iron designed for electronics work. (one that does not get too hot) After the wire is removed heat the solder pad on the board and then tap the edge of the board on the table top to knock off the excess solder. You can also use solder wick (available at Radio Shack) to remove excess solder. If the wire goes through a hole in the board, heat and tap so that the hole is clear. Insert a new clean wire through the hole, touch the point of the soldering tip to the board contacting both the solder pad on the board and the wire that goes through it at the same time and quickly apply very fine wire rosin core (electronic solder) to the connection. The solder should flow instantly bonding the wire to the electricial contact pad on the board. If that connection is a surface bond type, meaning no hole through the board, use the same method making sure that there is no tension on the wire until the solder "freezes" bonding the pad and wire together. While you are at this, replace the wires anyway!!! and make them longer by about an inch. I added a connector at the midpoint(I posted a picture here in the forums a while back) in the wires so I could take the wires loose and leave the board in place (my battery snap connector would not easily fit through the cocking slot so I was always putting excessive strain on the solder joints where the leads were solder to the board. By installing new longer wires I was also able to zip tie the wires to the neck of the ram, assuring that they were positioned out of the way of that pinch point between the shells. A new snap on battery connector (Radio Shack) usually comes with long wires already attached. Use that so you have room to route the wires cleanly through the frame. It is hard to over- emphasize the necessity of a clean finished solder joint on the board. Strip only enough insulation off the wire to just make the solder connection. The (original)gob of silicone seal on the board where those wire connect was intended to provide strain relief, thus protecting the joint. After you have completed the new solder joints, wipe it clean with an alcohol dampened gauze pad to clean it, then re-apply a dollop of silicone seal to protect the joint. Edited by Bruce A. Frank - 29 December 2006 at 1:07am |
|
|
|
|
|
|
Post Reply
|
|
 Tweet
Tweet
|
| Forum Jump | Forum Permissions You cannot post new topics in this forum You cannot reply to topics in this forum You cannot delete your posts in this forum You cannot edit your posts in this forum You cannot create polls in this forum You cannot vote in polls in this forum |


 Topic Options