
|
Original rocket cocker for M98 |
Post Reply 
|
| Author | |
hatonmyheadok 
Member 
Joined: 31 July 2013 Status: Offline Points: 7 |
 Post Options Post Options
") Thanks(0) Thanks(0)
 Quote Reply Quote Reply
 Topic: Original rocket cocker for M98 Topic: Original rocket cocker for M98Posted: 31 July 2013 at 6:54pm |
|
Just like the title says: I have a M98 and I just bought the original rocket cocker, however, I'm at a bit of a loss as to how to install it. It seems like there is something not quite right. The spring is negated by this upgrade? It seems like the cocking bolt slides right into the rear bolt.
Any help would be much appreciated! |
|
 |
|
|
Mack
Moderator Group 

Has no impulse! control Joined: 13 January 2004 Location: 2nd Circle Status: Offline Points: 9906 |
Post Options
Thanks(0)
Quote Reply
Posted: 31 July 2013 at 7:06pm |
|
Split the gun halves, remove the charging handle, replace it with the smaller one supplied in the kit, put the two halves back together and fasten the cocking part in place with the two supplied screws in the two holes in the vicinity of the end cap.
|
|

|
|
|
|
|
hatonmyheadok
Member
Joined: 31 July 2013 Status: Offline Points: 7 |
Post Options
Thanks(0)
Quote Reply
Posted: 31 July 2013 at 7:11pm |
|
That's about as much as I could figure out from looking at it. Like I said, though. It's hard to understand how it works with or without the spring.
Thanks for the reply. |
|
|
|
|
hatonmyheadok
Member
Joined: 31 July 2013 Status: Offline Points: 7 |
Post Options
Thanks(0)
Quote Reply
Posted: 03 August 2013 at 2:55am |
|
I think you're referring to the rocket cocker II.
This is the one I bought, the original.   Here's the diagram of my gun.  Do you see how the drive spring pushes the rear bolt toward the barrel of the gun? How in Dr. Seuss does that work with the rocket cocker? It's still shipping to me, so I don't have it in my hands, but it seems like it would need to work similar to the way it does now and I don't see how it can. I'm hoping it all makes sense when I toy with it. Kudos to anyone who can shed some light. |
|
|
|
|
hatonmyheadok
Member
Joined: 31 July 2013 Status: Offline Points: 7 |
Post Options
Thanks(0)
Quote Reply
Posted: 03 August 2013 at 3:06am |
|
I just read it comes with instructions. Must have missed that part. We will see. I'll post up some pics of the instructions and install when I get it.

|
|
|
|
|
hatonmyheadok
Member
Joined: 31 July 2013 Status: Offline Points: 7 |
Post Options
Thanks(0)
Quote Reply
Posted: 03 August 2013 at 8:18pm |
|
Okay, I received the cocker in the mail today! Ordered Thursday, got it today (Saturday).
It was pretty straightforward, however, I was mostly confused initially by the photos on ebay. The listing doesn't show a picture of the holes on either side of the beaver tail. This allows the pin to lock the spring in position. I took some pictures with my phone. Sorry, they aren't better quality, but I just wanted to make available some more information on this upgrade. 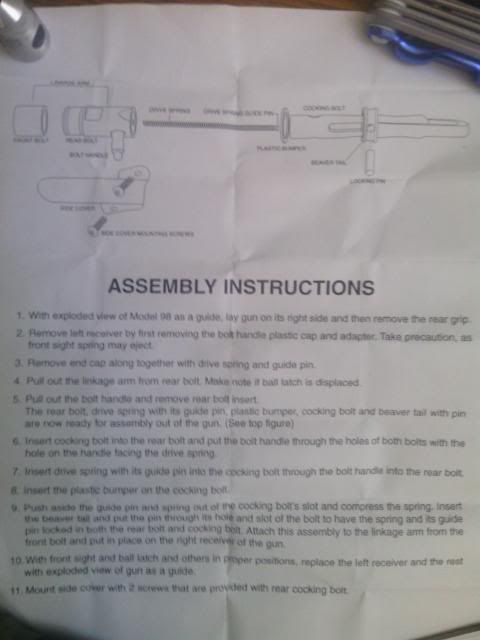 I pretty much ignored the instructions and looked at the diagram above. Nevermind the washer, I put it on after taking the photo. I just wanted to see how it fit together. 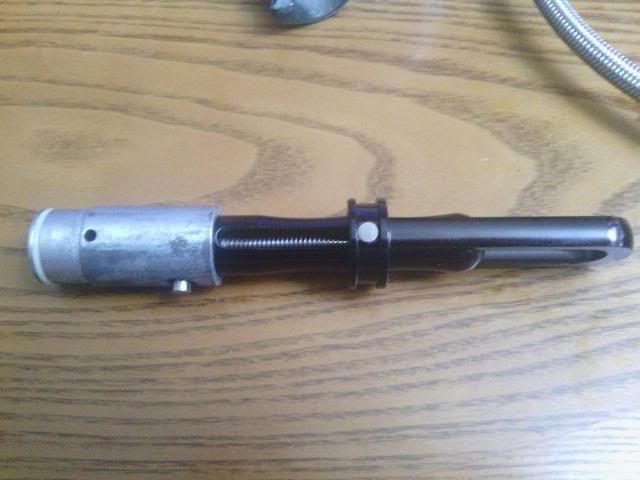  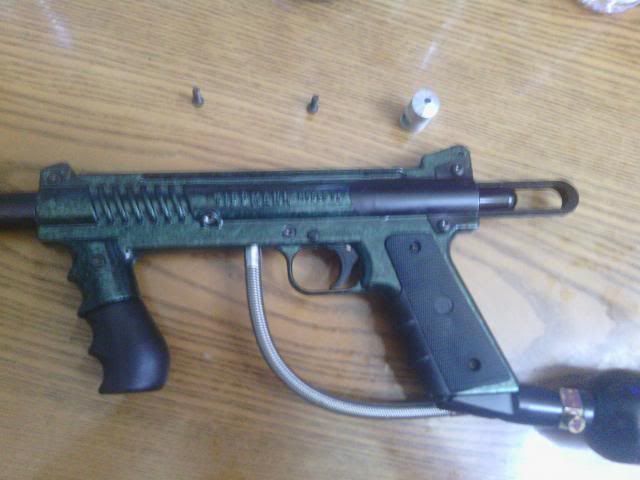 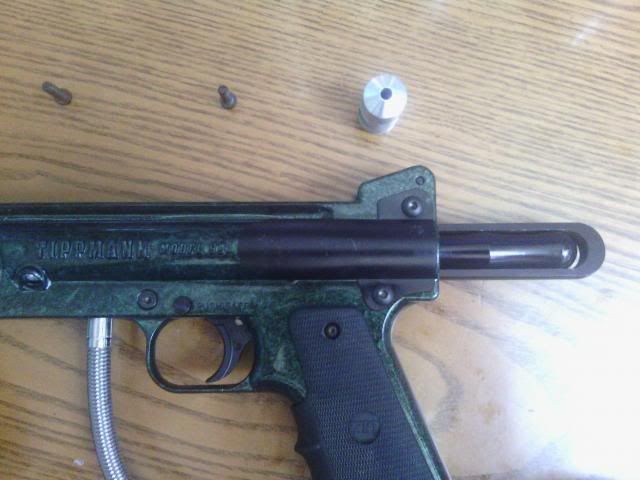  It all fit together very nicely and gave me another reason to clean this gun out. It took a good fifteen minutes- the hardest part being the spring. You have to depress the spring with all of it tacked together, then slide the pin in. Make sure you get the spring fairly centered on the pin. Once you have that done, it's all gravy. Just replace and enjoy. If anyone wants me to transcribe the instructions, I might. :) They are highly obtuse, though. I would want to paraphrase, or make my own instructions. My impressions are great. I was a little worried about the plate that covers the cocking hammer slot- it seemed unreasonably thin. I thought it was plastic at first, actually, but I bolted it on and it seems pretty solid. The feel and look of this upgrade really makes this gun, to me. I've always loved the marblizer paint and the additional black just offsets it so nicely. I'm also really pleased that the gun will be closed up tighter. I put a nice coat of oil inside the gun, and I'm just waiting for a few more parts to finish it up. Looking at the rocket cocker II, I definitely like the original better. That's why I bought it. :) I'ts hard to imagine why they decided to switch the design. This one seems very solid.
|
|
|
|
|
Post Reply
|
|
 Tweet
Tweet
|
| Forum Jump | Forum Permissions You cannot post new topics in this forum You cannot reply to topics in this forum You cannot delete your posts in this forum You cannot edit your posts in this forum You cannot create polls in this forum You cannot vote in polls in this forum |


 Topic Options