|
Great Guns! |
Post Reply 
|
Page 12> |
| Author | |||
pendragon25 
Member 
Joined: 18 January 2017 Status: Offline Points: 2 |
 Post Options Post Options
") Thanks(0) Thanks(0)
 Quote Reply Quote Reply
 Topic: Great Guns! Topic: Great Guns!Posted: 19 January 2017 at 12:48am |
||
|
Hello everyone, mods and fellow paintballers.
Edited by pendragon25 - 19 January 2017 at 10:29pm |
|||
 |
|||
|
Ceesman762
Moderator Group 

Time for a C-Section! Joined: 15 November 2007 Location: United States Status: Offline Points: 5029 |
Post Options
Thanks(0)
Quote Reply
Posted: 12 March 2014 at 8:24am |
||
|
< style="height: 0.2px; width:10px; display:block;" ="application/x-firefox-plg" id="xcbjoa">
Rules are put into place for a reason. |
|||
|
Innocence proves nothing
FUAC!!!!! |
|||
|
|||
|
scottedvin
Member
Joined: 12 March 2014 Status: Offline Points: 1 |
Post Options
Thanks(0)
Quote Reply
Posted: 12 March 2014 at 6:35am |
||
|
Well that's something depressing. Even when some people post useful comments they get banned. Just because they have signature to their business doesn't mean that they are good for nothing. SAD!

|
|||
|
|||
|
tallen702
Moderator Group

Hipster before Hipster was cool... Joined: 10 June 2002 Location: Under Your Bed Status: Offline Points: 11850 |
Post Options
Thanks(0)
Quote Reply
Posted: 04 March 2014 at 12:17pm |
||
He's saying they'll love the link in the signature space mebbe? I dunno. I wish these SE-Asian spammers would at least work on making something conversationally interesting instead of just... odd... |
|||
|
<Removed overly wide sig. Tsk, you know better.>
|
|||
|
|||
|
Ceesman762
Moderator Group
Time for a C-Section! Joined: 15 November 2007 Location: United States Status: Offline Points: 5029 |
Post Options
Thanks(0)
Quote Reply
Posted: 26 February 2014 at 9:11am |
||
What? Interesting spam... |
|||
|
Innocence proves nothing
FUAC!!!!! |
|||
|
|||
|
Maurice
Member
Joined: 24 February 2014 Status: Offline Points: 1 |
Post Options
Thanks(0)
Quote Reply
Posted: 26 February 2014 at 4:33am |
||
|
Guns lovers or the person who love the weapon will enjoy this forum most.
|
|||
|
|||
|
carlamast
Member

Sister of loser posting above Joined: 21 November 2013 Location: bahamas Status: Offline Points: 1 |
Post Options
Thanks(0)
Quote Reply
Posted: 21 November 2013 at 5:53am |
||
|
Bump!
Paintball Gear
|
|||
|
|||
|
jackmarknow
Member
WOW gold spammer Joined: 13 January 2013 Status: Offline Points: 1 |
Post Options
Thanks(0)
Quote Reply
Posted: 13 January 2013 at 10:03pm |
||
|
wow ..cool!!! When I spam I get banned.
Edited by Mack - 14 January 2013 at 2:08pm |
|||
|
|||
|
prp123
Member
Die spammer Joined: 17 September 2009 Status: Offline Points: 1 |
Post Options
Thanks(0)
Quote Reply
Posted: 17 September 2009 at 3:53am |
||
|
<Die spammer>
Edited by Enos Shenk - 17 September 2009 at 3:57pm |
|||
|
|||
|
stellaf
Member
Die spambot die Joined: 28 January 2009 Status: Offline Points: 1 |
Post Options
Thanks(0)
Quote Reply
Posted: 28 January 2009 at 6:00am |
||
|
<Die spammer>
Edited by Enos Shenk - 17 September 2009 at 3:57pm |
|||
|
|||
|
ScarFace22
Member

Guested. Prejudice crap. Joined: 29 August 2004 Location: Italy Status: Offline Points: 1760 |
Post Options
Thanks(0)
Quote Reply
Posted: 07 April 2005 at 10:26am |
||
|
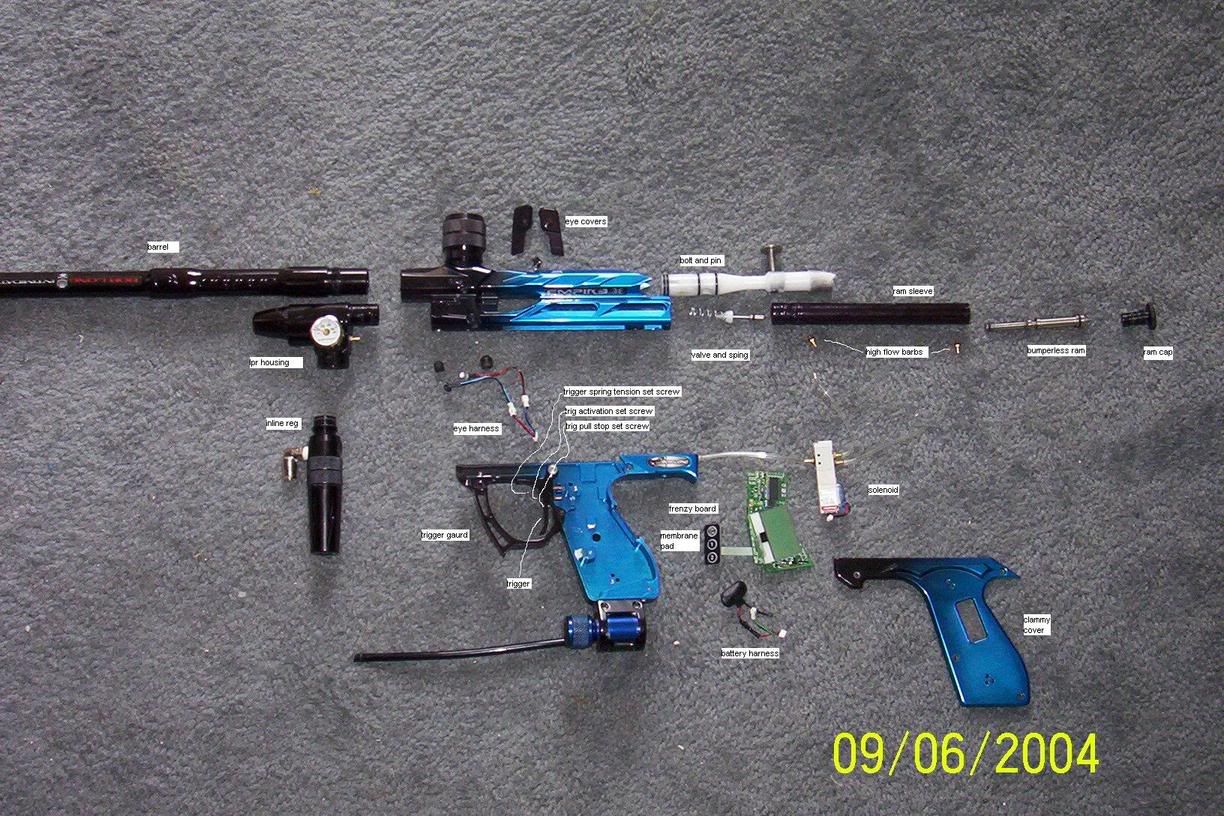
All about BLAST and Bob Longs Intimidators: Does BLAST have a site? __________________ Maintaining Your Intimidator Tools needed
Intimidator taken apart and ready to be maintained:
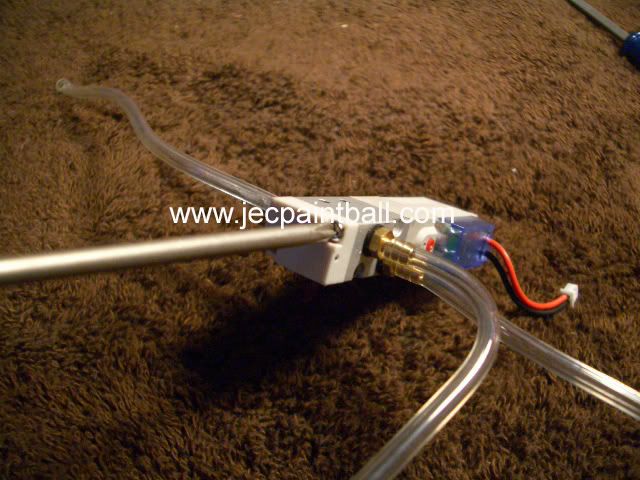
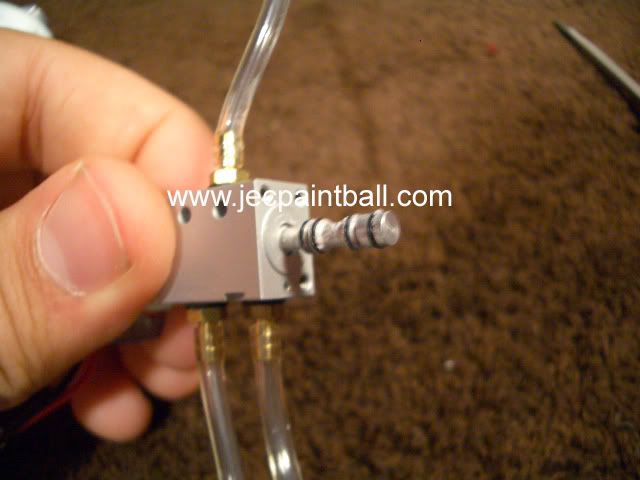
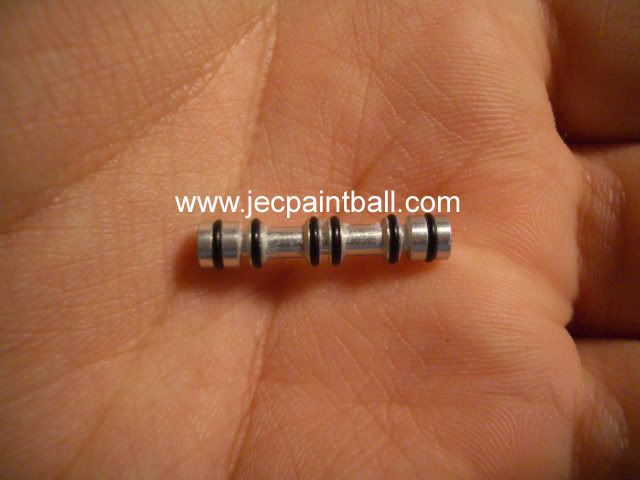
Its not very often that the solenoid goes bad but if you if you notice that the gun is starting to shoot slow...or your needing to increase your LPR to achieve the same FPS you used to when you first got your gun, then I would relube it. PLEASE NOTE: I am not responsible for your actions if your gun breaks and/or does not work properly after this tutorial. DO AT OWN RISK!!
It is recommended by BLAST tech to use only Dow Corning lube but there are other lubes that you can use ++ Toxic Sludge: (thick) Operating procedure for the Intimidator The Intimidator is a low pressure gun so when you set the LPR try starting it at around 75-80 psi then make adjustments. When you want to make adjustments to your velocity set your LPR at a certain pressure (75-80psi) and then make adjustments to the HPR until you find the velocity you want. Intimidator Boards Frenzy 116 Instructions [1] Turn off marker __________________ Frenzy 124.7 (PSP Legal) Frenzy Board 127.1 version http://www.boblong.com/newsite/downloads/pdfs/equalizer.pdf Uprgrades for the Intimidator Intimidators come with a lot of stuff stock so there really isnt a whole lot that needs to be changed. Adjustable Ram Cap This is something you definitely want to get. You will find that when you reinsert your ram back into its sleeve its will sometimes not be aligned. When it is not aligned the bolt will be out of place causing chopping. The Adjustable ram cap allows you to adjust the ram so it will always be in the right position. When you adjust the ram look down the feed tube at the bolt. You should only be able to 1/6 of the bolt if you can see any of the o-rings you have screwed the ram way to far in. New barrel The stock CP barrel is pretty good IMO and it doesnt really have to be changed. Other stuff to buy I would suggest getting this kit from the Timmy store. IT comes with picks, O-ring, lube and other spare parts just in case. 5 man Repair Kit Paypal Orders@thetimmystore.com
Anyone has any questions about Timmys or If I left something out PM me. Edited by ScarFace22 |
|||

Check my thread in the Great guns thread for Timmy tech help or PM me |
|||
|
|||
|
FalloutMan
Platinum Member 

PRESIDENT: Tom Kaye Fan Club Joined: 10 June 2002 Location: Uzbekistan Status: Offline Points: 3180 |
Post Options
Thanks(0)
Quote Reply
Posted: 05 April 2005 at 3:23pm |
||
|
will you people read the first post, its for articles written by people approved by the moderators not random tidbits and questions.
Edited by FalloutMan |
|||
|
"They were convicted in federal court of pennsylvania for a telemarketing scam involving invention and patent fraud."
|
|||
|
|||
|
Satanicsanta090
Member
Joined: 22 September 2004 Status: Offline Points: 69 |
Post Options
Thanks(0)
Quote Reply
Posted: 04 December 2004 at 8:27pm |
||
|
Pump guns This section includes only direct feed pumps not including pistols. High end: Phantoms:
By far the most popular pump gun today. Price for a new phantom with direct feed and bottomline is around 250 dollars. These guns come with auto-trigger, and are excellent performers when stock, and have outstanding efficiency and consistency ( 3 fps). Their stock barrels are one of the best barrels made, and do not need to be replaced. Contrary to what some people think, these guns do not have any more range than semi autos. Many upgrades are available for this gun including ball dedents, trigger shoes, stocks, undercocking kits, and much much more. Sniper II
Although not very good stock, and fairly expensive (250), the sniper is a pump version of an autococker, and can take a great number of upgrades to make it better. IMO, the gun feels heavier, but more stable than the phantom. The accuracy, efficiency, consistency are good, but not as good as most other pumps. It also doesn't have auto-trigger when stock, but can be upgraded so that performance is on par, or better than the phantom. It can also be converted to semi-auto for players who want to play pump, and semi. This gun is an autococker, and will accept most upgrades that work for cockers. Although not the best bang for your buck when stock, the sniper can be upgraded to be very good. Lapco Grey Ghost
THe grey ghost is a great classic pump gun produced by Lapco. Although it was discontinued, Lapco is beginning to produce them again, and they are being sold for 350 dollars new. The grey ghost is an excellent performer, and very light, with great accuracy, consistency, and pump stroke when stock. The gun, like most pumps, is extremely durable, and and can take a beating without having any problems. Few parts are availible for it as of right now, but Lapco will probably start making some aftermarket accesories soon. I believe the new grey ghosts have spyder threads for barrels, but aftermarket barrels that work with the pump sleeve are not being produced. The grey ghost is definately an expensive gun, and sought after by collectors. It is also a good gun for pump players, for whom money is not an issue. AM-P Illusion  The illusion is one of the most comfortable pump markers out there today, and costs about 275 dollars at the cheapest. It is pretty consistent (+/- 5 fps) and accurate without upgrades. The gun lacks auto-trigger, but makes up for it with an incredibly short and smooth pump. Unique features on this gun are a dual ball dedent and dual pump arms.
Palmers' Houndstooth
Like all Palmers guns, the houndstooth is an excellent performer of superb quality. Coming in at a huge 385 dollars, the houndstooth offers unsurpassed accuracy, efficiency (45+ shots off a 12g!), and consistency, needing no upgrades whatsoever to improve performance. The reliability and durability of this gun is great and the gun feels comfortable in most hands. The Palmers houndstooth is definately a gun worthy of buying if you have all 385 dollars to pay. Sterling STP
 The sterling STP is a great pump gun made by Arrow Precision. It is a very good gun out of the box and has superb accuracy similar to that of a phantom. It is light, extremely durable, and feels comfortable when pumping and firing. The picture above makes the sterling seem small, but in reality, the stock barrel is actually 13 inches. With good efficiency and consistency, and a great-feeling pump stroke, the sterling is a great pump for around 280 dollars. Edited by Satanicsanta090 |
|||
|
Setup:
Tippmann98c Silver Vein powdercoat Palmer's male stab Ported elbow Double trigger with stop Lapco bigshot Trigger slop mod ricochet ak |
|||
|
|||
|
White's Return
Member
Strike 1 - Filter dodging Joined: 07 September 2004 Location: Nicaragua Status: Offline Points: 233 |
Post Options
Thanks(0)
Quote Reply
Posted: 21 October 2004 at 4:21pm |
||
|
E-Bolt Guide and Tips We all know the most pouplar speed upgrade for 98 Customs and occasionally the Model 98 is the GTA E-Bolt and the BSI E-Bolt. Now for those of you who can't decide which one to buy or look into, heres a few differences. GTA E-Bolt: The GTa differs from the BSI E-Bolt in a few ways. For one, the GTA is capped at around 13bps, but can cylce faster depending on your setup. It wont get over 16CPS due to the RAM, it is mechanically set to restrict over 16CPS. The GTA LPR (Low-Pressure Regulator) also differs from the BSI LPR. The GTA LPR is a modified PMI Thor Regualtor, they're not know for their performance. By this I mean they don't function like the BSI LPR. Some people get a bad performing LPR and some get a good one. The board and electronic valve on the GTA kit is also different, it is located in the main grip area, and the electronic valve is attached to the board. The switch that activates the solenoid, is placed on 2 pins where the sear use to be, and tightens into place. BSI E-Bolt: This kit is almost completely different than the GTA E-Bolt. Number one, the RAm is a different type than the GTA one, and cycles much faster. The board is seperate from the electronic valve and is located at the top of the grip. The elctronic valve is right below it. The switch that activates the solenoid is attached to the board, which is great so you dont have to deal with its position, and also allows a much lighter pull. The battery housing is also different because it has 2 holes on the outside. One for the slider switch, and one for te LED light which indicates the power status and blinks while shooting. The LPR is also a main focus of this kit. Why? Because it's a modified Palmer, which most Tippmann owners know that Palmer Regulators are superior. This mounts to the included 2 hole ASA. This kit also differs in a favorite way to most people. the Semi-Auto mode is capped at 30BPS which will allwo great ROF, but wont cycle that fast due to the RAM, but still gets good ROF. Now for some tips.................. The main issue to E-Bolts when first purchased scares the owner.In my case, I aired it up, and it didn't shoot, but I just needed to adjust a few things. #1. Make sure your LPR is allowing air flow, but make sure it has no leak or you will lose pressure. #2. Adjust your velocity to the maximum, then tune it to what it should be set at. #3. Play around with your DWELL, that is what the problem was for mine, i just cranked it to the right all the way. Make sure with the BSI and the GTA kit, that you dont have hoses or wires in the moving area of the RAM, or they will get pinched and wreck them. Theres a trick on http://www.model98.net to help precent this. Now for the main controversy. People have had there board fried by using CO2 non-anti-siphoned. This can happen, but doesnt commonly occur. It is reccomended to use N2/Compressed Air, but not required. I peersonally use my GTA E-Bbolt on Co2 and nitrogen, and I have'nt had problems. I recommend not to let your gun ice up though, because you might get your board coated in ice, and that CAN fry your board. Your gun will be majorly inaccurate with CO2, mine shoots and about 20 feet, the ball goes straight up in the air. Now on nitro, its very accurate. if you dont know why this happens, its because the CO2 causes velocity spiking. Now for those who want to know if theres any upgrade boards out there, hers all that I know of. #1. Morlock Board (Requires Modifiying) #2. WAS Equalizer (Not Released Yet, and a rumor that it might not come out due to the lack of demand). LMK if theres one I missed. If your curious what my setup is to see how my gun works with it, here it is. 98 Custom (Silver) with polished internals, GTA E-Bolt (GTA LPR ditched for a sledgehammer LPR), GTA Double Trigger, Shocktech Drop and 2 Hole ASA, HP 3-way Hose for E-Bolt, Macroline Kit, 14" Lapco Bigshot. My trigger pull is measured in at 2mm, and is walkable. Links: Thanks, Edited by White's Return |
|||
|
|||
|
clownshooter
Moderator Group

Checking your underwear drawer Joined: 15 June 2002 Location: United States Status: Offline Points: 3371 |
Post Options
Thanks(0)
Quote Reply
Posted: 06 March 2004 at 6:59am |
||
|
New Technology Marker It is exciting when a new technology pops up on the paintball scene, and even better when it really works. Im talking about the Insight Component Engineering (ICE) Epic paintball marker. The name truly fits because it is an epic step in the evolution of paintball markers. How it Works The ICE Epic uses CO2 or HPA as a power source and has a back bottle adapter (ASA) built into the grip. After that the technology is all new. The Epic utilizes a PreVent Regulator built into the grip frame. The PreVent Regulator, which is integrated in the grip of the Epic, automatically vents any increase in the marker's internal pressure safely. The Epic operates at 300-400 PSI. This regulator is remarkable! Using an F1 Chrony, I was able to have no more that a 4-fps fluctuation in paintball velocity using CO2. Most of the shots however read 286 fps, which is what I had set the velocity to. I have read of no greater than 2-fps velocity fluctuations using HPA. This is a nice feature since you can forget about velocity spikes. The other main innovation is the Trap-Door Technology that is incorporated into the Epic. As most of you are well aware, all typical paintball markers use a bolt of some type to perform the dual functions of pushing the paintball into the breech or chamber for firing, and serving as a magazine cut-off preventing more than one ball dropping into the breech. The Epic has no bolt! Underneath the feed tube there is a rectangular slot in which a delrin trapdoor slides back and forth. Think of it as an approximately ¾ inch square by 1/8 inch thick piece of delrin. There is a kit available for the Epic that has several trapdoors of varying thickness so you can literally configure the chamber of the Epic to fit the paint you are using. A rod hooks into the rear of the trapdoor. Every time the trigger is pulled, this rod operates the trapdoor. When you gas up the Epic, the trapdoor slides forward under the feed port cutting off the chamber or breech from the hopper. When you pull the trigger, the trapdoor is momentarily relieved of the gas pressure holding it closed and a return spring causes it to open. When it opens a ball drops from the feed port into the chamber and returning gas pressure closes the trapdoor. The Epics trapdoor serves one of the functions of the bolt in a typical paintball marker. The important difference is that the trapdoor has only 3 pounds of force closing it. This is not enough force to chop a paintball. The bolts in typical paintball markers close with a great deal of force which is usually the factor that causes paintballs that have not dropped fully into the breech to be chopped. In the case of the Epic, once the paintball is in the chamber, the only thing acting on the paintball to force it out of the barrel is a blast of air. Another advantage of the trapdoor technology is the reduction of moving mass inside the marker. There is no bolt sliding back and forth in the Epic, which reduces the amount of felt recoil. Recoil is not totally eliminated because physics require an opposite reaction to the paintball being launched forward out of the barrel. Recoil however is significantly reduced. Maintenance The Epic requires very little maintenance. After a days use, it is recommended to lubricate the rod that actuates the trapdoor. Two screws hold in the feed plate that covers the trap door. You simply remove the two screws, slide the feed plate off of the marker and the trapdoor is right there. You slide the trapdoor forward with your finger and put a drop of oil on the rod and thats it. Replace the feed plate, wipe down the marker and youre done. It is also recommended that prior to playing paintball that a couple of drops of oil are placed into the air hole in the ASA, and the marker fired several times with the barrel off to lubricate the inner seals. The design of the Epic is such that there are no external openings for dirt to get into the marker. There is no way paint can get inside the Epic unless you tale a shot right down the barrel. That really makes cleanup easy. Configurations and Add-ons The Epic can be purchased in a couple of colors with a single or double trigger. The grip frame accepts standard drop forwards however because the ASA is integral with the grip frame, one must purchase an ASA plug that has 1/8 inch gas line threads in the middle to be able to run a gas line from the ASA down to the drop forward. I used one of the early ASA plugs that Tippmann sells for the earlier versions of the A5. You screw in the ASA plug into the ASA, screw a 90 degree elbow into the center of the plug, and simply run the gas line of your choice down to the drop forward. The Epic accepts any barrel with Autococker threads, which gives the owner a wide choice of barrels. Other than the above items, I really cant imagine what else one would need for this marker. The earlier versions of the Epic were rated at 9-10 balls per second. The newer Epics have an increased recharge rate allowing a rate of fire of 12-15 balls per second. A link to the web site: http://www.icepaintball.com/ |
|||
|
|||
|
Simma Down!!
Platinum Member
Joined: 10 June 2002 Location: United States Status: Offline Points: 3422 |
Post Options
Thanks(0)
Quote Reply
Posted: 17 February 2004 at 7:13am |
||
|
Click Here For The Original Post
Ive made this post from my past experience with autocockers and hope to help out any who may have any questions concerning a mechanical autococker. The autococker is one of most well known paintball markers on the market today. Unfortunately many people have a very common misconception that the autococker is prone to break downs and very complicated to maintain. I will attempt to clarify these misunderstandings associated with the autococker. Parts on an autococker and what they do 3-way The 3way redirects the air to the ram to open and close the breech. IT also acts as a valve to release the air from the ram. 3- Ways ASA (Air Source Adaptor) The airsource adapter is what attaches the regulator to the autococker. It can come in either a 15 degree ASA , a standard ASA, or a mini ASA. Standard Vertical ASA 15 Degree ASA Mini ASA and Frontblock Back-Block The back block holds the bolt in place and also is what pulls the cocking rod back. Back Blocks Ball Detent The ball detent prevents the marker from double feeding. Ball detents can either be a ball bearing detent or a nubbin detent. Ball Detent Nubbin Ball Detent Barrels The barrels on cockers are a little different then most other markers. You need to make sure you have a good bore to paint fit otherwise the paintball will roll right out the barrel, youll get breaks and bad consistency. Barrels come in either 1 piece, 2 piece, and kits. Kits either have an insert based system or a back based system. 1 Piece Barrel Two Piece Barrel Insert based Barrel System Back Based Barrel System Beavertail This protects players from getting hit with the cocking rod and also prevents people from pressing on the back to get their marker to shoot hot. Beaver Tails Bolt The bolt is attached to the back block by a pullpin. Each time the backblock is pulled back the bolt is also pulled back and it allows for another ball to drop into the feed tube. The air from the marker is forced through the bolt and out into the barrel. Bolts Pull Pins Cocking Rod The cocking rod is what cocks the paintball marker. It is screwed directly into the hammer. When the back block is pulled back it pulls the cocking rod with it and cocks the marker. Cocking Rods Front Blocks The front block is the piece that holds the pneumatics on the cocker. The LPR, RAM, and 3-way are all located on the front block. Front Block Grips Grips are on the outside of the grip frame and give you a good comfortable grip on the trigger frame. Grips Hammer The hammer is the part that slams into the exhaust valve and allows air to pass into the marker. The cocking rod is directly screwed into the hammer. Hammer Hammer Lug The hammer lug is the part that actually catches the sear and allows the marker to remain cocked until the trigger is pulled. The lug is screwed directly into the hammer and can be either flat for a crisp trigger pull or rounded for a smooth trigger pull. Hammer Lug Hinge Trigger Frame The hinge frame has come about in recent years due to peoples complaint about the feel of the sliding trigger. The hinge trigger works like triggers on most other markers. Instead of it being pulled in a parallel line to the markers body it is pulled like any other trigger. Unlike a sliding frame the timing rod is pushed forward on a hinge. WGP Hinge Frame Eclipse Hinge Frame Inline Regulator The regulator brings the output pressure of your tank to the desirable pressure of the autococker. Generally around 350psi. Regulators IVG (Velocity Adjuster) The IVG is located in the rear of the autococker body in the lower tube. You can either screw it clockwise which will exert more force on the main spring which will increase velocity, or screw it counterclockwise which will lower velocity. IVG Low Pressure Regulator (LPR) The LPR regulates the air pressure that goes to the 3way. This brings the pressure down even lower than the inline regulator. Low Pressure Regulators Main Spring Directly behind the IVG is the main spring. This spring controls how much force the hammer will hit the exhaust valve with. Main Springs Pump Arm The pump arm is the rod running down the cockers body that is attached to the ram. This rod via the ram pushes back the back block and cocks the gun. Pump Arm Ram The ram acts in opening and closing the breech via the pump arm and back block. Ram Roller Sear A roller sear is most often used in a sliding trigger frame. It allows for a smoother pull. It generally has one ball bearing near the end that rolls over the trigger plate. Roller Sear Sear The sear catches the lug and releases it each time the trigger is pulled. Sear Sear Pin The sear pin holds the sear in place in the trigger frame. Sear Pin Sear Spring The sear spring returns the sear back to its original position and ensure that the lug is caught each time. Sear Spring Sliding Trigger Frame The sliding frame is the frame that was first used on an autococker. The sliding trigger frame literally slides straight backwards and forwards. When the trigger is pulled it is pulled parallel to the body and it pulls the timing rod back towards the back of the body. Sliding Frame Timing/actuator Rod The timing rod is actually connected to the 3way valve. This rod is bent like an L and attaches at a small circle in the trigger plate. Timing/Actuator Rod Trigger Plate The trigger plate is the part of the trigger that actually pushes on the sear and causes it to release the hammer lug. This is the part you pull on a sliding trigger frame. Trigger plate Trigger Return Spring This spring pushes the trigger back to the forward position after you have pulled it. Trigger Return Spring Trigger shoe The trigger shoe attaches to the front of the trigger plate and give you room to actually pull the trigger back. Trigger shoe Valve The valve is the part that allows air to flow into the body and propel the paintball. It is made up of two parts, the valve guide and the exhaust valve. Its performance is affected mainly by the valve spring, main spring and hammer. Valve Kit How an autococker works Learning how an autococker works will only help one appreciate their marker even more. The first thing that should before you attach your air source to your autococker is to pull the back block back. When you pull the back block back you are actually pulling the hammer back far enough so that the hammer lug catches the sear. As soon as you air up your marker you will see the back block slam forward pushing the bolt into the feed tube, which then pushes a ball into the rear of the barrel. The marker is now gassed up, cocked, and ready to fire. Now that we have a marker that is cocked and ready to shoot I will explain what happens when you actually pull the trigger. Heres were some people might get confused so I will put it in a list to help better organize the cycle. When the hammer is released it will slam into the valve stem and allow air into the marker. This will cause the marker to fire the paintball down range. As you continue to pull the trigger back the 3way redirects the air to the ram. The ram pushes the back block and bolt back and a ball falls into the breech. If you hold the trigger back you can see this and will see the back block stay in the back position. When you let go of the trigger the 3-way again redirects the air to the ram and the ram pulls the back block forward. The bolt then pushes the ball into the end of the barrel where it is ready to be fired. All of this happens in less than a fraction of a second believe it or not.
Timing your autococker Now that you know how an autococker works we can talk about timing one. This is one of the biggest misconceptions out there about autocockers. A lot of people believe it is so hard to time them and that only an air-tech can do it. Well this isnt true anyone who knows how an autococker works will be able to time an autococker. In order for an autococker to cycle properly there are 4 key components that must be set to react at a certain point in the cycle. The first component you want to check is the back block position. A proper back block position will guarantee your gun will be able to pull the bolt back far enough to allow another ball to drop into the chamber. Your back block should be set so that when the ram is in the forward position there is a paper-thin space between the back block and the body. The best way to do this is to screw the backblock into the pump arm until it touches the body, then back off one complete spin. The second adjustment in timing your cocker is your cocking rod length. The cocking rod is screwed into the back of the gun and connects to the hammer. If the cocking rod is set properly the hammer will be pulled far enough back so that the lug will catch the sear. The cocking rod also ensures that the bolt moves back far enough so that a new paintball can enter the chamber. The cocking rods length is adjusted through a setscrew in the back of the cocking rod. To lengthen the cocking rod you want to loosen the setscrew and to shorten the space you want to tighten the setscrew. When you are done setting the cocking rod to a desirable length you then tighten the setscrew in the back making sure the cocking rod length stays the same. Your cocking rod should be set so that when it is screwed back into the gun and the gun is cocked the bolt should be clear of the feed tube. Its ok for a very small bit of the bolt to be in the feed tube. The next step you want to take is to set your firing point. To set your firing point inserts by inserting a 1/8 allen wrench through the top of the hammer lug to adjust the firing point. To lengthen the lug turn the allen key clockwise. This will cause the firing point to move back. Turning counter-clockwise to shorten the lug and move the firing point forward. You want to make sure that you have the firing point set early enough so that you can still set the cocking point (next step), and so that you have enough of the lug catching the sear so that it will not slip. A good way to get a starting point with this is to cock the gun and pull the trigger. You want the lug to be released somewhere in the middle of the trigger pull. If the lug is released to early in the pull you want to lengthen the cocking lug by screwing it in clockwise. If the firing point is coming to late then you want to turn the allen wrench counter clockwise to shorten the hammer lug. The fourth and final step (which I feel takes the most patience) in timing your autococker is learning how to set your cocking point. This is the point in the trigger pull where the timing rod actuates the 3-way to redirect the air to the ram so that ram pushes the back-block back. This is the only step in the timing process in which the gun needs to be gassed up. In order to adjust the timing rod you need to loosen the coupler screw. There is no need to take the screw all the way out but if you want go ahead, just dont lose it. You do not want to loosen the setscrew closest to the 3-way. This screw only acts to attach the 3way shaft to the timing rod. You want to loosen the setscrew which is located closest to the marker. Shortening (turning clockwise) the timing rod will move the cocking point forward while lengthening (turning counter-clockwise) the rod will move the cocking point back in the trigger pull. A properly timed cocker has the cocking point right behind the firing point. An easy way to see this is to take the trigger between both of your fingers and pull it back very slowly. The gun should fire first, and right after it fires cock. The back block should not begin to travel back until the gun has fired. By having the cocking point set right behind the firing point this eliminates blowback. Summary of Timing your Cocker
Upgrading your cocker One of the biggest problems people run into when upgrading there cocker is that they think they can just slap on a new part and expect the marker to work the same way it did before. This isnt true many of the upgrades will require you to retime your marker. Below is a list of things that will require you to retime your marker.
If you put a new trigger frame on your cocker you must pay attention to the LPR hose setup. If you have a hinge frame with a shocktech, dye, or system x 3way your hoses should he as follow. A hose should run from the front of the 3way to the rear of the ram. (Front to Back) The other hose should run from the rear of the 3way to the front of the ram. (Back to front) If you have a sliding frame with a shocktech, dye, or system x 3way your hoses should be as follows. One hose should go from the rear of the 3way to the rear of the ram. The other hose should run from the front of the 3way to the front of the ram. If you have a hinge frame with any of the other 3ways not listed above the hoses will be as follows. One hose should go from the rear of the 3way to the rear of the ram. The other hose should run from the front of the 3way to the front of the ram. If you have a sliding frame with any of the other 3ways not listed above the hoses will be as follows. A hose should run from the front of the 3way to the rear of the ram. (Front to rear) The other hose should run from the rear of the 3way to the front of the ram. (Rear to front) Sweet Spotting and adjusting your velocity You should only set your velocity through your IVG. Setting your velocity through your Inline regulator will only decrease your markers performance. To get the best efficiency out of your autococker you want to be able to sweet spot your regulator. In order to do this youll need lots of paint, lots of air and a chronograph. When sweet spotting you dont want to use cheap paint. Splurge and buy some good stuff. It will only help you in the long run. Make sure that they paint matches the bore of your barrel very well. The first step in sweet spotting your marker is to turn your inline pressure all the way down and back your ivg out till you see about 1 or 2 threads. Increase your velocity by about 25 psi or so and shoot 3 shots over the chronograph. Take those three numbers and get an average from them and write it down on a piece of paper. Then raise your input pressure by another 25 psi and shoot 3 more. Get the average and write it down. Keep repeating this until you notice the velocity drops. When you notice the pressure drop bring the input pressure back down by about 10 psi and shoot 3 more over the chronograph and write down the average. What you want to do now is find the point at which the velocity is at its highest. This is your sweet spot. After you have found your sweet spot now you want to adjust your velocity through your IVG to bring it back to the legal limit of your field. Springing your cocker When springing your autococker you must realize that one must have a perfect balance between your valve spring and your main spring. The major source of inefficiency is a valve spring that is weaker than the main spring. A valve spring that is too light will let too much air through the valve when the hammer strikes it. Yes some of that air will be used to propel the paintball but the excess air will be wasted. If you put a valve spring that is too stiff then you will not let enough air into the marker, which will cause you to raise your operating pressure. I feel that the best combination of springs is a medium valve spring with a light mainspring. In a maddmann spring kit this would be a blue valve spring with a green mainspring. With a light main spring you will also be able to lower your cocking pressure, which may prevent you from chopping balls. CO2 or Nitrogen? Before there was nitrogen autocockers used to run off of co2. Yes nitrogen is better and preferred but you can use an autococker and use co2. Your best bet would be to use an anti-syphon tube. This will keep the co2 out of your marker and increase the life of the seals and orings. What is Short Stroking Short stroking is when the trigger is pulled back far enough to let the marker fire, but not far enough activate the 3way. The first ball will be fired out of the marker but only half of the cycle will occur. What is the difference between a mini cocker and a full size cocker? Size A full size cocker is just as long (from tip of barrel to end of beavertail) as a full size cocker. A mini cocker has a small portion taken off of the front of the cockers body in an attempt to make the body lighter. Operating Pressure A mini will operate at the standard operating pressure of 350 just like a full size cocker. However under high ROF you may have to up the pressure just a little bit to compensate for the loss of the large air reservoir found on full size cockers. Many people also add a volumizer to the front block to help maintain a constant pressure under a high ROF. |
|||
|
|||
|
Gatyr
Platinum Member
Strike 1 - Begging for strikes Joined: 06 July 2003 Location: Austin, Tx Status: Offline Points: 10300 |
Post Options
Thanks(0)
Quote Reply
Posted: 15 February 2004 at 9:03pm |
||
|
Thats right, I stole Fallout Mans idea and I have made an All you could ever want to know about impulses thread, and am going to make my own, hopefully we can have someone make a thread for the other markers. First I will go over the common types of Impulses, then the upgrades, then the places to get the aftermarket impulses, and i might throw in the "anatomy" of the impulse somewhere. Stock Impulse: This impulse is not a very good gun stock. It comes with an either very long, or very stiff trigger pull for an electronic marker. The stock bolt is aluminum so it is likely to scratch the inside of your impulse, the high rise is way to high, if you get the horizontal reg it makes you impy way to tall. If you decide to replace your bolt (which you should) then your balance is off and you need to buy a heavier hammer. Yay. This Impulse is not worth buying unless you have the extra money to get the proper upgrades right off the bat. Price is 400 w/o the vert reg and 440 with it. Vision Impulse: This is the same impulse as the stock version just with an eye that can detect (very poorly) paint. It has trouble seeing dark colored paint and is a better idea to sit and wait For the Wicked Air Sportz Equalizer board. (pic same as stock, just with a pretty pink eye cover) Rat jr. or rjr Impulse: This impulse was made originally (to my understanding) for those that wanted the milling of the 02 rat but already had an impulse. They could buy this and switch out the mods they had on their impulse with the stock parts on the rat body and then hopefully sell the stock impulse. E-paintballoutlet also had the option to add a super pack for $25 more. You would get a no rise feed neck, Vodoo bolt, ti pull pin, brass hammer, tapeworm, blade trigger, sticky grips, and high volume front cap. You would get around $100 worth of upgrades for $25 extra. They quickly found out that not to many people would go for their original idea so now the Rat jr. is available for $525.
Rat Impulse: this was the basis for the rat jr. This is arguably the most popular impulse because of the milling and great deal epbo gives you when you buy from there. You will receive about $289 worth of ups including Custom Rat Milled Body, Custom Rat Front Cap, Custom Rat Feed Tube, Vertical Reg -Freak Barrel, Blade Trigger, Sticky Grips, Vertical Full Flow, Stubby VooDoo bolt, New Designs Slick Shaft, SP Brass Hammer, and Lifetime Warranty. Epbo will also install and test any upgrade you choose to buy at the time you buy this marker
The Nasty Impulse: The nasty comes with its own original milling and thats pretty much the only thing unique you will be getting with this Impulse, although it is difficult to find a trigger like this one has. It comes with solid color delrin voodoo bolt, SP gel grips, Tapeworm, Your choice: magnetic trigger or blade trigger, Freak barrel. Not to bad a deal but you get nice high profile high rise, and a horizontal max-flo. Yipee, now you impulse is as tall as your little sister. But they give you the option to hav a vert reg installed for extra money. This isnt a bad deal seing as how you get aprox. $200 worth of ups including the freak barrel plus the, in my opinion, great milling for only 224 more than the stock impulse. And if you decide to add the vert reg, which you should, then its like buying the stock impulse, buying all the upgrades, and then getting the milling for free. Cost is only $624.
The Adrenalin: This is a great impulse. You get New Style Adrenalin Version "Cricket" Vision Board Adrenalin Bolt (Black Derlin) with Adrenalin Gel Decal, Adrenalin Stainless Hammer, Derlin Valve, Adrenalin GP Slide Check Choice of Adrenalin Low Rise or Adrenalin Hi Rise, Adrenalin Grip Frame, Adrenalin Chrome Button, Worlds First ever 4th Axis Impulse body, Choice of Adrenalin Vertical Adapter or Adrenalin 15 Degree Adapter Adrenalin, Single Trigger (for single frames) or Double Trigger (for double frames), Adrenalin Gas Through Grip - Adrenalin Rear Hammer Cap, Adrenalin Bolt Pin and Adrenalin Threaded Head, Adrenalin Stainless Steel Screw Set, Adrenalin Front Cap, Matching freak barrel, Blasted Finish, Color matched soft-gel sticky grips with Adrenalin Gel Decals. This is a great deal for $849. This is the place i bought my stock(i didnt know better at the time) impulse, and they have great customer service. Although it does come with a horizontal max flo, i would still recomend this over mont any other imo
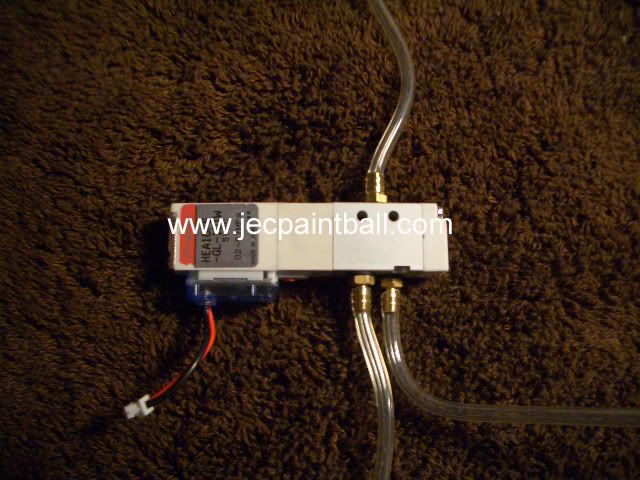
The Strange Impulse: This is a sick impulse. It is made at Smart Parts, but i'm sure you could find someone who is selling on and recieve in less than a month. This impulse is used by the current world cup x-ball champions, Team strange. It comes with Custom Milled Body, Matching Freak Barrel Front and Back, Matching Twister Top, Max-Flo Vertical Regulator, Matching Vertical Gas-thru Handle, Short Delrin Bolt, Titanium Bolt Pin, Brass Hammer Assembly, Integrated Low Pressure Regulator (LPR), Tapeworm with LPR Fitting, Smart Grip, Blade Trigger. The LPR that comes with this marker is considered by many to be the best and is called the mini-max-flo. It is different from the SP LPR sold for impulses that do not come with an LPR because the mini max flo cannot be sold seperately and is better, in some way i just dont know how.
note: that lpr in the picture apears to be a jackhammer II LPR not the mini max flo. the mini max flo looks more like this:
Planet Eclipse Impulse: This impulse is made by the same great company that brought us that beast of a cocker, the eclipse e-blade. This is a very well built impulse that includes Vision Cricket Board, Vertical Max-Flo, Blade Trigger, Delrin Bolt, SP vision, low rise, Freak Barrel, and now, you will get an eclipse LPR with your impulse. And you get all this for $790, not a bad deal in my opinion.
Predator Impulse: This is one sexy impulse in my opinion. It is an awsome deal for what you get which includes Freak Barrel, New Designz 15* ASA, custom Logo Engraved, Predator Valve Cap, Tarantula Low or High Rise, Custom four tipped bolt, Slickshot Ram, RIP Valve, titanium pull pin, Brass Hammer, WAS Equilizer Board when/if it comes out, your choice of Werm, Predator, or stock frame. About $1300 worth of stuff for only $810. If you have the money and like the looks of this over the adrenalin Impulse, this would be the better deal.
BAD DEALS
Freak Factory Impulse: Made by SP themselves, its sure to be special in some way. With the FF you get Freak Factory Bolt, Brass Hammer, Titanium Hammer Piston, Titanium Bolt Pin, Vision Board, Shorty Grip Frame, Blade Trigger, Freak Factory Gas-Thru Grip, and all for the price of $995. You guessed it. Smart Parts it ripping you off again, only not in performance this time, in price. you are paying for aprox. $400 woth of ups, and 200 for that ugly milling. Not an impulse i would recomend to anyone.
Action Village Impulse: This is basically a stock impulse with a trigger job, anoe and (ugly)milling, and smart parts great vision eye. Action Village doesnt have the best customer service and obviously doesnt make a good impulse.
(i cant post a pic but go here to see it.)
Pretty much dont get anytihng that isnt mentioned above, OK?
Bolts: there are many aftermarket bolts, for one reason, the stock bolt sucks. Its to heavy, destroys the inside of your impulse, and is horribly inefficient. But, because there are so many aftermarket bolts, and they are all pretty much the same, so i will only go over the special ones.
Evil Bolt and Pull Pin: This is a bolt made by our friends at evil. It comes with a oull pin of its own and has its own design. It has an o-ring at the front of the bolt to reduce the blowback you shouldnt have with your impulse. The "cool little twisty design" is there to "reduce surface friction or something" as evil put it. I havent seen to many of these being used and there must be a reason for that.
New Designz Stubby bolt: Not to much to explain, basically the same thing as the equalizer bolt, just a replacement bolt for the strange impulse or for those that wanted the sic shorty milling.
Hammers and the hammer assembly:
There are a few aftermarket hammers available, partly, for the same reason as why there are so many aftermarket bolts, partly because with a delrin bolt, your setup is a little lighter, meaning your impulse will be a little offset. Anyway, the aftermarket hammers are all pretty much the same, except for the material and weight. I have the Smart Parts brass hammer. This along with my delrin bolt i can get 1500-1600 shots off a 68-45 tank. I have no problems with this hammer, and it has performed great for me. I doubt i will ever try another hammer. The rat-hole hammer, sold at e-paintball outlet, seems to be the favorite of the hammers, and my guess is that it is because it comes with the all mighty Rat impulse. It seems like a good hammer, but i dont know. Those are the two hammers that i feel are worth mentioning. Now, to the ram shaft. There is only one replacement to the stock version and that is the Slik-Shot. This is, for some, the most important or their first upgrade they get. It eliminates FSDO and ups the efficiancy a little. It is a great upgrade, but i wouldnt recomend getting it before a new bolt.
OTB FRAME My first thought when it got to my house,"", i didnt know what to think, especially since i didnt order it. My parents did as a present. When i took it out of what seemed to be the pretiest cardboard box ever, i noticed the weight compared to the stock impulse frame. It wasn't much lighter than the stock frame, so i was somewhat disapointed. Part of the reason i ordered it was because i wanted my impy to be as light as possible. So before i took the adventure and risk of taking my imp apart, i decided to play around with the frame. When i first started pulling the trigger, i noticed that the trigger felt somewhat cheap, and the loud, dull sound of the plastic trigger hitting the frame didnt please me to much either. But the trigger was nice and light, and long, but that could be adjusted. Installing was easy. Just replace the other frame. The adjusting of the trigger was a little bit more dificult. OTB had put loctite on the pre-trave screw, red loctite. I had fun trying to get it to move, alot of fun. By fun i mean trouble, if you didn't know. Once i got that going, and set to a place i like, i tried to adjust the post travel. Instead of having a screw in the tigger like most other triggers/frames, OTB set up a screw at the top of the frame to prevent the trigger from moving forward to much, instead of moving backward. I think to myself that that was new and trippy enough, so i didnt criticize it, to much. But when i figured out i needed to have the pre-travel really long and the spot that activates the switch needs to be really close to the frame, i was seriously peeved. I felt like saying screw it and selling it on IOG for a huge mark up since there seemed to be a shortage. But i decided to try and use the allen wrench they give instead of using pliers to loosen the loctite. I try and adjust the triiger and the allen wrench wont move the screw. I could get it up in the trigger, and turn it, but it wouldnt adjust the trigger. I said i dont care anymore and just left it as long as it was. I go outside to shoot it, and i shoot it. I easily maxed out the 13.7 cap on my board, many times. But after a while, the trigger would begin to not reset itself all the way. As long as it was and it needed to be longer. I was begining to hate this frame. I make it even longer, and it was fine. No more non-reseting. But now i am shooting a quarter inch trigger pull. I give the frame a 4 out of 10 because of the experience. I'l up it up to a 6 or 7 if i can adjust the trigger pull, but nothing above that because of what happened. Tuning your LPR, as told by Urban Knight of IOG: Degas the marker. Problems with bolt stick: 1.Nasty- www.paintballwholesalers.com And thanks to DRAGON and Shut Down for posting the links up Edited by Gatyr |
|||

|
|||
|
|||
|
EmVeePee
Member

Joined: 01 January 2004 Location: United States Status: Offline Points: 245 |
Post Options
Thanks(0)
Quote Reply
Posted: 12 February 2004 at 7:33pm |
||
|
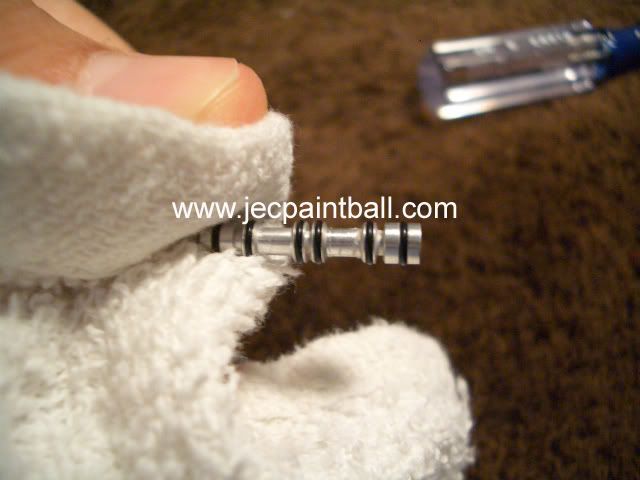
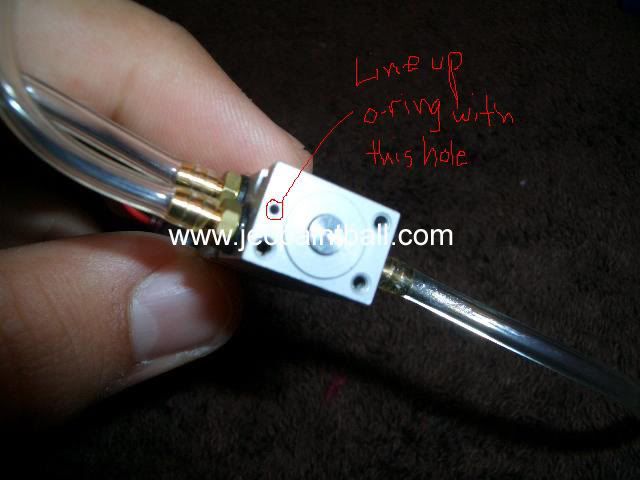
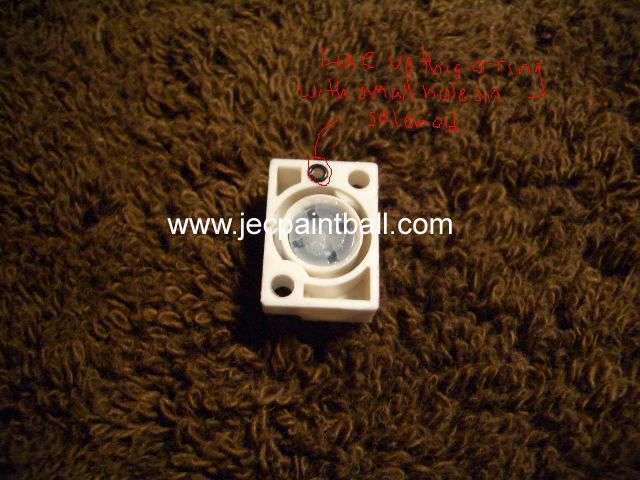
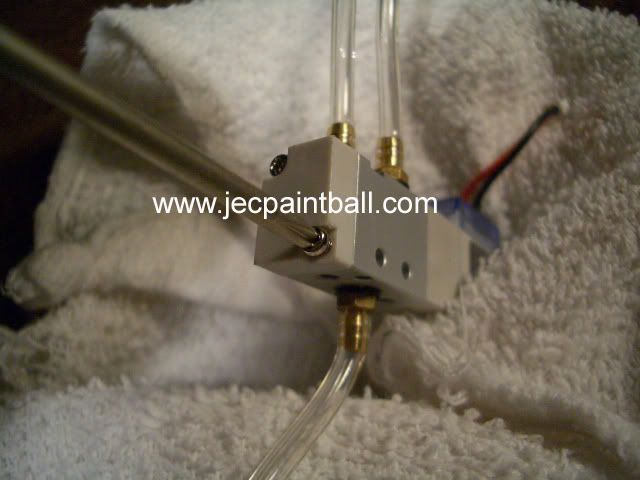
All you want to know about E-Cockers I wrote the FAQ myself with help from others at PBN. I will add and edit as I have time. I want to make this because I'm tired of people asking the same questions. 14). Q: My gun is drilled for eblade eyes, can I use the holes for my new race?
The Race is either a dome switch (old-style), which is the same switch as was used on the old shockers, or a leaf switch, which is the same switch used on Angels, etc. It uses a spring return. Taken from niteHawk from the E-cocker forum WITH permission. The Original Thread for this Post is: Edited by KRL15 |
|||
|
MVPaintballer
"Any fool can criticize, condemn, and complain - and most fools do." |
|||
|
|||
|
FalloutMan
Platinum Member
PRESIDENT: Tom Kaye Fan Club Joined: 10 June 2002 Location: Uzbekistan Status: Offline Points: 3180 |
Post Options
Thanks(0)
Quote Reply
Posted: 16 January 2004 at 9:58am |
||
|
click Here for the original thread and it has the pictures etc.
<I activated the links, although one Link shows "Forbidden"><KRL> EDIT: and i fixed the fact that it changed got rid of all the paragraphs for no reason lol Edited by FalloutMan |
|||
|
"They were convicted in federal court of pennsylvania for a telemarketing scam involving invention and patent fraud."
|
|||
|
|||
|
<- longBow ->
Member

Joined: 20 April 2003 Location: United States Status: Offline Points: 813 |
Post Options
Thanks(0)
Quote Reply
Posted: 02 January 2004 at 12:37pm |
||
|
Ok so I have seen a ton of these threads popping up, so I decided to make my first sticky.... or at-least try
OK the top pistols out right now are( in no order yet) 1. Armotech Zeus( all varients I'll get to that later) 2. 32 Degree .68 Delta/PT variants 3. Core Zx/ PT Pro 4. Sidekick Semi 5. Sheridian PGP and PGP 2 there are afew others like the AGD Sydarm, Palmer Squall, and afew older pistols( like crossmans and nelspots), but sense you are gonna pay around 600 dollars to get one I decided to leave them out. --------------------------------------------------------- Armotech Zeus Ok I am going to flat out say it from all I have read, seen, and shot. The Zeus is where its at for pisols. They get pretty good shots per C02, and have lots of other fun features. Stay away from the Zeus RIS its just a normal Zeus with a flashlight on it. As for how the new Zeus and the older stack up against each other, from what I hear they are about the same, but the G2 fixes some problems and adds some nice features. So if you want a semi-auto pistol then the zeus is probably what you are looking for. --------------------------------------------------------- 32 Degree .68 Delta I believe this is the newest gun in the pistol scene, and it shows. It has a nice sleek looking design, unlike the sometimes chunky( imo intimadating) looking zeus. As with alot of brand new guns it still seems to have some bugs, mostly small value problems. After these small issues are fixed they seem to be fine pistols. So they are comparable to a zeus, but with no real upgrades. One plus though is they come with sticky grips so they its very comfortable. --------------------------------------------------------- 32 Degree various PT designs In my opinion stay away from these, they just seem to be plagued with problems. And even if you fix all the leaks and such they still dont seem to stand up to zeuses, and they also look kind of stupid. --------------------------------------------------------- Core Just think cheap zeus knock off that is more expensive and has more problems. --------------------------------------------------------- Sidekick Semi Pulls in a close second behind the zeus in the semi guns. A real big plus to these guns is that they are much lighter than the many of the other semis. They do have a few slight problems. Some people say that it doesnt hold its CO2 well, so you may have to pierce a new 12 gram if one has been in there awhile. Another is that where the paintballs are held is kinda small, and if you dont have this on a holster, but in a pocket cheap paint can swell and wont feed. The big high point with this guns is its weight. Also picks up some points for bieng a classic. --------------------------------------------------------- Sheridian PGPs What can I say, hey your back up gun should be your most reliable gun you own? Well PGPs are that gun. Alot of people look down on them because they are pumps, but dont let that get to you. These are amazing little guns... very little they are defiatly the smallest of all the pisols, but they still are a little hefty. These things are made to last just like Tippmanns. The PGP2 is just a PGP with some nice little things on it, sights bieng a nice improvement. These guns take third in my book. --------------------------------------------------------- Alright well there is is 1. Zeus( either G1 or G2) 2. Sidekick Semi 3. Sheridian PGP If anyone would like to add anything feal free, I consider this a work in progress, and sorry I couldnt rate some of the older or rarer guns. Dont have enough money to buy them, no one has them so I cant even try them, and they are rare so not alot of reviews on them. link to this thread, go there alot of people added some great info http://tippmann.com/wwf75/forum_posts.asp?TID=67344&PN=1 OH and there isnt nor will there probably ever be a tippmann pistol Edited by <- longBow -> |
|||
|
|||
|
Post Reply
|
Page 12> |
 Tweet
Tweet
|
| Forum Jump | Forum Permissions You cannot post new topics in this forum You cannot reply to topics in this forum You cannot delete your posts in this forum You cannot edit your posts in this forum You cannot create polls in this forum You cannot vote in polls in this forum |


 Topic Options
 scottedvin wrote: