
|
heres my bravo one |
Post Reply 
|
| Author | ||
A5G36C 
Member 
Joined: 16 August 2007 Location: Canada Status: Offline Points: 8 |
 Post Options Post Options
") Thanks(0) Thanks(0)
 Quote Reply Quote Reply
 Topic: heres my bravo one Topic: heres my bravo onePosted: 05 June 2008 at 5:29pm |
|
|
heres my tippmann bravo one. i painted it olive drab, cut the carry handle off and flat topped it, put some weaver rails on the top, added a bt4 assault carry handle, sight riser, and a tasco 30mm red dot. im getting a longer rail to put on top soon and ill be moving the carry handle forward a bit. im working on putting an a5 ape rampage board in it and im getting a 98 cyclone soon.
Edited by A5G36C - 09 June 2008 at 3:11pm |
||
|
A5 I RT I G36C KIT I 16INCH BARREL I NCSTAR RED DOT I VORTEX I LIGHTNING ROD I HOME MADE QEPH I PEN SPRING MOD I Q-TIP MOD I POLISHED INTERNALS I HOWITZER BOLT I JCS RED HOT POWER TUBE I X7 HOPPER I
|
||
 |
||
|
unvolution
Member

Joined: 15 February 2008 Location: United States Status: Offline Points: 861 |
Post Options
Thanks(0)
Quote Reply
Posted: 05 June 2008 at 6:18pm |
|
|
nice looking gun
might wanna think of a longer barrel but if it works for you disregard that think and for whomever doesnt want to click the links    Edited by unvolution - 05 June 2008 at 6:19pm |
||
|
||
|
kurieitaa
Gold Member 

Joined: 07 March 2007 Location: Canada or Japan Status: Offline Points: 1444 |
Post Options
Thanks(0)
Quote Reply
Posted: 05 June 2008 at 6:36pm |
|
|
hi and welcome, hmmm the carry handle looks kinda small on it, nice work on the olive paint tho, good work.
|
||
|
||
|
sinisterNorth
Moderator Group 

1 strike, language, 10/3 Joined: 30 May 2004 Location: PA Status: Offline Points: 10463 |
Post Options
Thanks(0)
Quote Reply
Posted: 05 June 2008 at 7:59pm |
|
|
Not bad.
|
||
|
Pumpker'd; (V.) When a pump player runs up and shoots you at point blank range because you thought 20bps made you good.
|
||
|
||
|
Yomillio
Platinum Member 

Retard Joined: 31 July 2005 Location: United States Status: Offline Points: 3398 |
Post Options
Thanks(0)
Quote Reply
Posted: 05 June 2008 at 8:03pm |
|
|
A 14" barrel would do wonders.
|
||
|
||
|
dustin85
Member

Joined: 08 August 2007 Location: United States Status: Offline Points: 128 |
Post Options
Thanks(0)
Quote Reply
Posted: 05 June 2008 at 8:08pm |
|
|
Hopefully not as stupid a question as I think it might be, but what is the difference between the "Bravo One" and the Alpha Black? Never heard of the Bravo before now...
Nice work BTW. I would consider moving the carry handle up slightly, and perhaps lowering the rail to where the top 'line' is on your marker now. Other than that, looks pretty sharp. *If you are concerned with looks, like Unvolution mentioned, I would look into replacing the barrel, front sight, and handguard as you see fit. Note: Carry handle placement reference 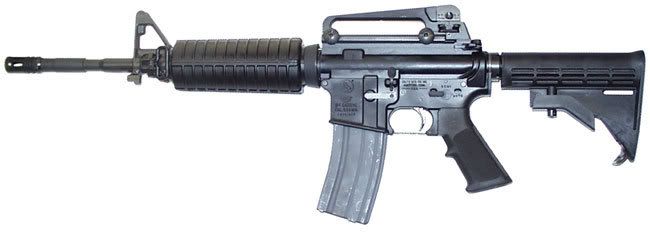 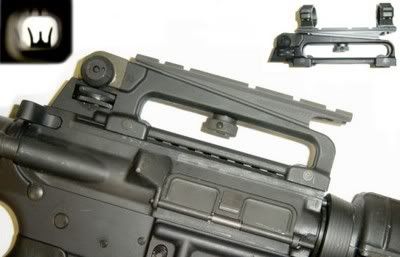 |
||

|
||
|
||
|
oldpbnoob
Platinum Member
Not old, Not noob. May be Dave's grandma Joined: 04 February 2008 Location: Yankee Stadium Status: Offline Points: 5676 |
Post Options
Thanks(0)
Quote Reply
Posted: 05 June 2008 at 9:52pm |
|
|
The Bravo One is the Canadian version. |
||
|
"When I grow up I want to marry a rich man and live in a condor next to the beach" -- My 7yr old daughter.
|
||
|
||
|
dustin85
Member
Joined: 08 August 2007 Location: United States Status: Offline Points: 128 |
Post Options
Thanks(0)
Quote Reply
Posted: 05 June 2008 at 9:55pm |
|
|
That makes sense...i was wondering how Tippmann planned on marketing a "U.S. Army" marker to international customers...Thanks.
|
||
|
|
||
|
||
|
oldpbnoob
Platinum Member
Not old, Not noob. May be Dave's grandma Joined: 04 February 2008 Location: Yankee Stadium Status: Offline Points: 5676 |
Post Options
Thanks(0)
Quote Reply
Posted: 05 June 2008 at 11:10pm |
|
|
BTW, Calvin and Hobbes rocks!
|
||
|
"When I grow up I want to marry a rich man and live in a condor next to the beach" -- My 7yr old daughter.
|
||
|
||
|
Grumbacher
Member
Joined: 15 May 2008 Location: United States Status: Offline Points: 25 |
Post Options
Thanks(0)
Quote Reply
Posted: 05 June 2008 at 11:44pm |
|
|
How did you go about flat-topping it?
|
||
|
||
|
dustin85
Member
Joined: 08 August 2007 Location: United States Status: Offline Points: 128 |
Post Options
Thanks(0)
Quote Reply
Posted: 05 June 2008 at 11:46pm |
|
HAHAHAHAHAH You are the FIRST to ever comment on that! Yes it does...there is ALWAYS a calvin sequence to express just how i feel! ( a sad statement about my true maturity level, but hey....) |
||
|
|
||
|
||
|
dustin85
Member
Joined: 08 August 2007 Location: United States Status: Offline Points: 128 |
Post Options
Thanks(0)
Quote Reply
Posted: 05 June 2008 at 11:52pm |
|
Excellent write-up from "Clone"/"Airhog" (this was on A5OG) on flat-topping an A5, most still applies, just have to cut off the carry handle.... "I've resurrected this from an old post of
mine so sorry for the double, however i get a lot emails for
instructions (SEARCH IS YOUR FRIEND) on this since rx78gp02 did his
Arms SIR mod. This is by no means the ONLY way to do this. Use your
imagination and be creative. The following is only a description of how
i did my first rail mod with limited tools. Only hand files, a grinder,
and a dremel were used, so it should be easy to duplicate in your spare
room with a little time and conviction.
__________________On with the goods... Hello all, I've been meaning to get a tutorial done on this for a while, so lets see if i can help you guys out a bit on these questions. I'll try to explain this as best i can using some of my older photos. This mod really isn't to difficult, although it's just as easy to screw it up, so take your time, and don't expect to finish it in a day. First off, you will need a few things at minimum... 1) The rail You will need a rail at least 10 1/2" long. the cheapest one out there is at cheaper than dirt, and will run you just under $20 shipped. This is the best rail (price vs. quality) i could find however it has one small problem. the rail is designed to go on a AR-15 handguard, so the bottom is not flat. As you can see in the picture, you will need to file/grind the bottom flat.  2) at minimum you will need hand files. A dremel is good, a grinder better, and a mill best  any decent set would do, however learning how to use them correctly
will save you a lot of time. You should be able to pick up a set for
under $20
any decent set would do, however learning how to use them correctly
will save you a lot of time. You should be able to pick up a set for
under $203) taps. While it is nice to have a whole set of the lying around, it can be very expensive, so for this project you will only need one tap. You will need a M6 tap (6MM) 1.00 thread pitch. While you could get one online, you can find them at any ace hardware, and you'll be going there anyway. You will also need a tap holder. 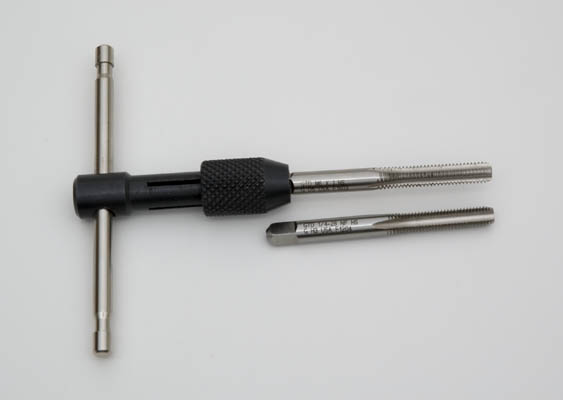 4) drill press. To drill the holes for the mounting screws it is best to have a drill press, while it could possibly be done by hand, you will only really have one shot to drill the holes in preparation for tapping. either way you go you will need a 5.2mm drill bit. A 13/64" bill will do as well (.2047 actual size) A 1/4" and a 13/32" bit will be needed also 5) Mounting screws. I have tried a couple of different sizes and find that 6mmx1.00(Thread pitch)10mm socket head screws work the best. they also use the same 5mm hex key as the front grip on your A5, so no new tools for disassembly are required. You can grab these at ACE for about $.25 each you will need two, but pick up some spares while your there.  6) Paint. Even if your careful, there's no way your getting out of this without a touch up at least. But since the rail is anodized, it will look a bit odd unless you paint it to match the A5 (Minimum) or paint it all together. There's way to many paint options to go into here, but by far the best stuff to use (If done correctly) would be Duracoat It's a bit expensive if you don't have the right stuff, but they do have durabake available in spray cans. 7) JB quick weld, also available at ACE.  On to the mod... Completely disassemble the A5, once striped down re-install all the body screws to hold it together. The best way to file it flat is to use the useless A5 weaver rail as a guide, in the pictures below you can see where i stop filing..   Once you get it down that far, use a straight edge as a guide and keep filing up the front of the A5 towards the barrel keeping it as flat as possible. Once you get it a point where you can lay the file flat on the A5 you smooth it all out. When doing so though, keep moving your hand position so not to wear a groove. You should end up with something like this...  \ \In that photo you can clearly see the stopping point. Next you will need to file of the "guides" and the remainder of the rear sight, as well as smooth out the front. This is where it all comes down to attention to detail. Go slow, and keep it as uniform as possible. Retain the curve of the A5 and bring it all the way back past the sights...    And then on to the front..  Once you have it down this far you can put the rail on top (wider end at rear) and cut the remaining material off the rail...  At this point you should have something that looks similar to this...  The rail is not attached, and it's been completely stripped of paint (optional) Now you can mark off any spots that need attention and get ready to fill the rear sight. I don't have a picture of the fill in process anymore, I'll update this when i get a chance. But basically just mask of the inside part of the receivers where the sight is with tape, and fill it with the JB weld. Just keep filing and sanding until its all flush. Do this to each side separately then join them together for the final sanding.  Now for tapping the threads. This can be a bit nerve racking since it's pretty much do or die. Sure you could fill in the mistake with JB weld, but it will never be as solid. There's only two real spots you can drill the holes in the receivers. You will need to join the receivers, and tighten all the body screws tightly. Lining up the rail with the A5 i drilled it (The rail) where the mounting holes will go using the 1/4 inch drill bit (1/4 inch bit is for the rail, not receivers!), then i place it on top of the A5 and carefully mark the holes for the receivers and drill them as well. you can see here where i drilled the holes... (*note you will also need to counter sink the rail holes using the 13/32 drill bit for the cap head screws*)   Don't worry to much about drilling to far, it wont hurt anything, but avoid it if possible. Once drilled, you can tap the holes with the M6 tap, use a bit of oil and go slow. Pushing down straight while turning. Once all is drilled an tapped, the rail should bolt right on. Mark of any spots that need to be filed and take care of them. Also on a side note, if you go ahead and remove all the body screws leaving the rail screws tight you will notice the receivers wont come apart. The two cap heads along with the rail act like a mini vise of sorts increasing the rigidity of the receivers. You will also notice that the rear body screw removal has done nothing to compromise the integrity of the receivers. I have literally done pull ups from one of my rail mods, and although not recommended, it just proves the strength of the overall modification. Alright, back on track here, now that the rail is attached, you can go ahead and file off the section for the cyclone to fit, just keep filing, test fitting the cyclone as necessary...  once finished your receivers are all done except for paint. Bolt it all back together and do a test fire. Things to watch for would be a sticky cocking handle, or a tightly fitting barrel adapter. Once painted you should have something that looks like this...  ...Well results may vary Any questions or if i left anything out let me know, check my galleries below in my sig for more pics as well... Good luck!" Edited by dustin85 - 05 June 2008 at 11:53pm |
||
|
|
||
|
||
|
oldpbnoob
Platinum Member
Not old, Not noob. May be Dave's grandma Joined: 04 February 2008 Location: Yankee Stadium Status: Offline Points: 5676 |
Post Options
Thanks(0)
Quote Reply
Posted: 06 June 2008 at 12:03am |
|
|
Calvin and Hobbes is one of the most mature cartoons ever produced. The vast majority of them were aimed at adults. Looking at your DOB, you would have barely been around when the strip was ended. My grandmother always said she thought Calvin reminded her of me. I took that as a compliment. |
||
|
"When I grow up I want to marry a rich man and live in a condor next to the beach" -- My 7yr old daughter.
|
||
|
||
|
dustin85
Member
Joined: 08 August 2007 Location: United States Status: Offline Points: 128 |
Post Options
Thanks(0)
Quote Reply
Posted: 06 June 2008 at 12:14am |
|
|
Yep, i was introduced to it by my grandparents as well! And a compliment it is! I think just like that guy...and I grew up in Indiana, so winters were always trying times for my parents! It's amazing what 3 brothers can do with snow in the front yard when your mother looks away for 10 minutes after reading through a book or two!
....pretty sure I am responsible for most of that dear woman's gray hair...LOL |
||
|
|
||
|
||
|
A5G36C
Member
Joined: 16 August 2007 Location: Canada Status: Offline Points: 8 |
Post Options
Thanks(0)
Quote Reply
Posted: 06 June 2008 at 8:49am |
|
|
the paint job is modled after the C7A2 assault rifle. i followed your flat top thread when i did my bravo one lol. im suppose to be getting an 11inch rail off a guy when ever he can meet up with me. and ya thats the only difference the bravo one is just the Canadian version. i plan on slapping a 16inch opsgear m4 style barrel on it i just need a a5 to 98 barrel adapter cuz the barrel i have was on my a5. ps how do you post pics on this forum without a link. i didnt take the time to look when i made this thread and im new here so please excuse the dumb question. Edited by A5G36C - 06 June 2008 at 8:54am |
||
|
A5 I RT I G36C KIT I 16INCH BARREL I NCSTAR RED DOT I VORTEX I LIGHTNING ROD I HOME MADE QEPH I PEN SPRING MOD I Q-TIP MOD I POLISHED INTERNALS I HOWITZER BOLT I JCS RED HOT POWER TUBE I X7 HOPPER I
|
||
|
||
|
dustin85
Member
Joined: 08 August 2007 Location: United States Status: Offline Points: 128 |
Post Options
Thanks(0)
Quote Reply
Posted: 06 June 2008 at 5:44pm |
|
|
photobucket.com
Create an account, then upload your photo, then copy the "IMG" code. Photobucket is on the level, really quick, and user friendly. You can use it for all your forum needs, so the two seconds it takes to register is well worth the time. |
||
|
|
||
|
||
|
Grumbacher
Member
Joined: 15 May 2008 Location: United States Status: Offline Points: 25 |
Post Options
Thanks(0)
Quote Reply
Posted: 06 June 2008 at 10:17pm |
|
|
You need a C7 magazine to replace that plastic one.
|
||
|
||
|
Post Reply
|
|
 Tweet
Tweet
|
| Forum Jump | Forum Permissions You cannot post new topics in this forum You cannot reply to topics in this forum You cannot delete your posts in this forum You cannot edit your posts in this forum You cannot create polls in this forum You cannot vote in polls in this forum |


 Topic Options

 oldpbnoob wrote: