How 2: Install E-Grip on Alpha Black Basic or Tac.
Printed From: Tippmann Paintball
Category: Paintball Equipment
Forum Name: Upgrades and Customizing
Forum Description: Trick it out!
URL: http://www.tippmannsports.com/forum/wwf77a/forum_posts.asp?TID=180757
Printed Date: 02 January 2026 at 4:49am
Software Version: Web Wiz Forums 12.04 - http://www.webwizforums.com
Topic: How 2: Install E-Grip on Alpha Black Basic or Tac.
Posted By: Syclops
Subject: How 2: Install E-Grip on Alpha Black Basic or Tac.
Date Posted: 11 March 2009 at 3:58pm
|
Hey everyone SYclops here. As promised, I have written a “How To” in regard to installing the E-Grip Upgrade on your Alpha Black Basic or Tactical model. Now some may ask, “why would you do a write up when instructions are included in the package?” The main reason is to educate those who wish to buy the upgrade but are a little leery concerning the install. I personally had many questions even before buying the thing…LYNRDSKYNRD, Splat and Coaxial…thanx for being patient with all my questions.  On to the install: 1) First and foremost, make sure you follow all safety precautions even before taking the gun apart (i.e. degas, uncock, etc.)
2) I started with the rubber grip. Remove the rubber grip from both sides of the receiver by taking out the small allen head bolts (x2)
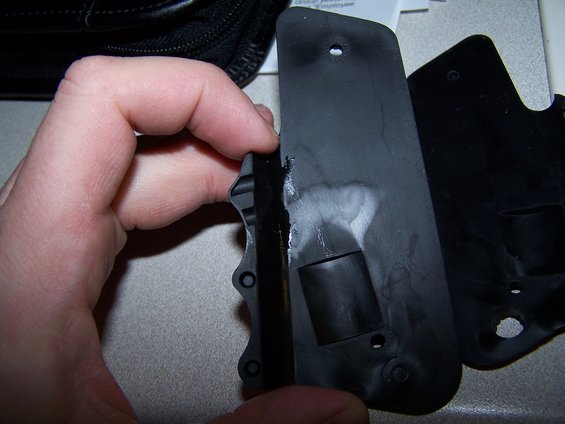 3) Take a razorblade and cut out the existing holes formed into the grip. This is where you will access the power button/mode selector switch and LED light.
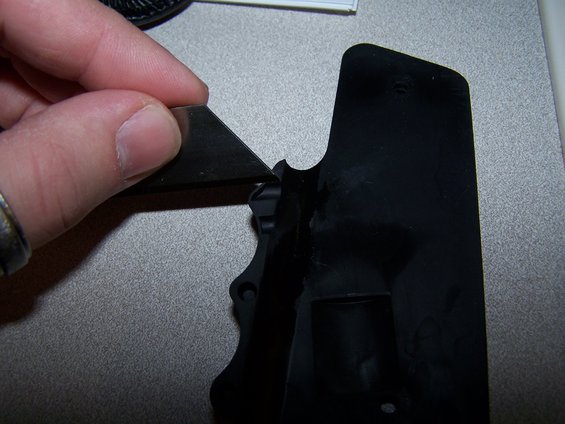 4) Remove all allen head bolts from the left receiver and pull the clamshells apart.
5) Next you are going to remove some material from the left hand received to make room for the battery. Place the left receiver inside up with the knockout plate flush on a flat surface.
 With a hammer and flat head screwdriver or punch start in one corner and carefully tap it loose by working your way around the plate until it is removed. It only took 1 hit in each corner to knock the plate loose.
 6) Next you will work on the trigger mechanism.
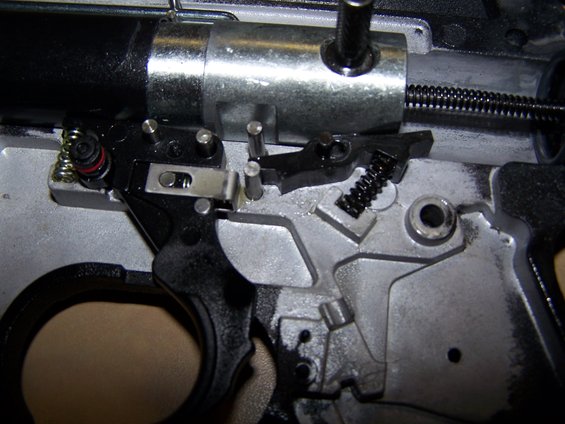 Remove the trigger and the trigger spring (Silver Spring on the left-hand side of the picture below will be re-used). Remove the trigger slider, slider spring and the two slider pins from the trigger.
7) Remove the old sear and sear spring from the right receiver. If the black dowel pin comes out, reinsert it. NOTE: save trigger slider, slider spring, the 2 slider pins and the sear and sear spring when and if you want to convert the gun back to semi-auto. These will not be used in conjunction with the E-Trigger.
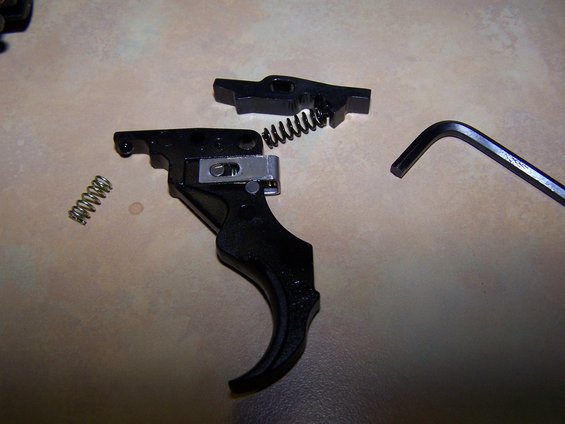 8) Insert the trigger and OLD trigger spring into the right receiver.
9) Install the NEW Sear and NEW sear spring into the right receiver.
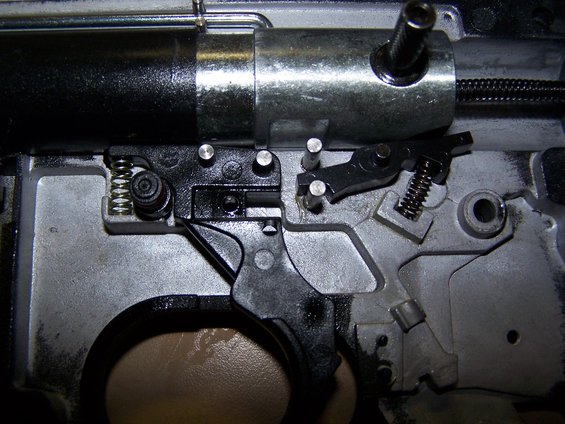 10) Now it is time for your electronics. Place the solenoid into the right receiver…it is the 1” thick silver looking thing.
11) Carefully align and insert the electronics board into the predetermined slot.
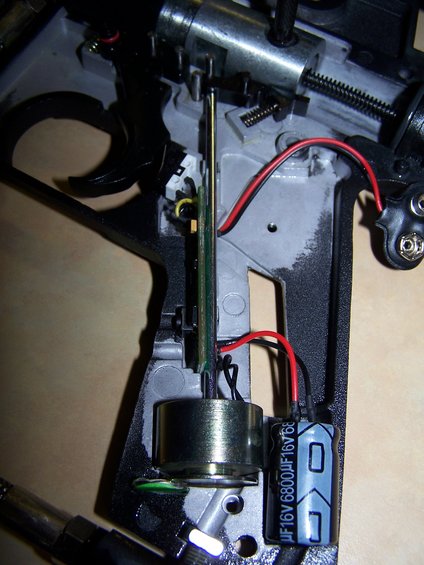 12) Place the trigger switch on two pins of the right receiver half. Insert the capacitor (black barrel looking object) in the provided slot.
13) Route wires in cutout areas to lay flat under armature pin and battery and not be pinched when receiver halves are reassembled. Visually inspect internal wires for disconnected wire ends or damage.
14) Insert armature pin into 2 slots so it moves freely, insert magnet in slot below armature as shown.
On the picture below you get a better idea of the arrangement of the trigger switch
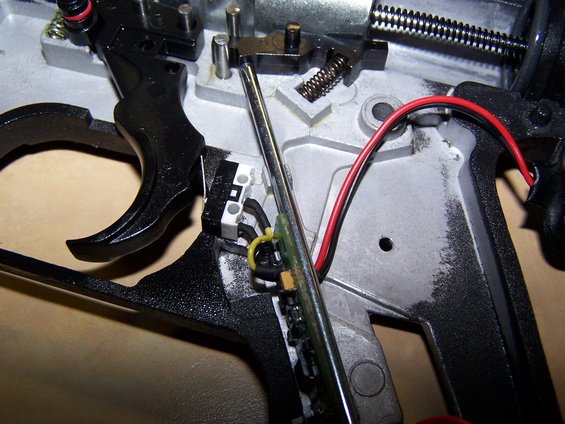 15) Double check all parts for proper placement and reassemble receiver halves.
16) Install
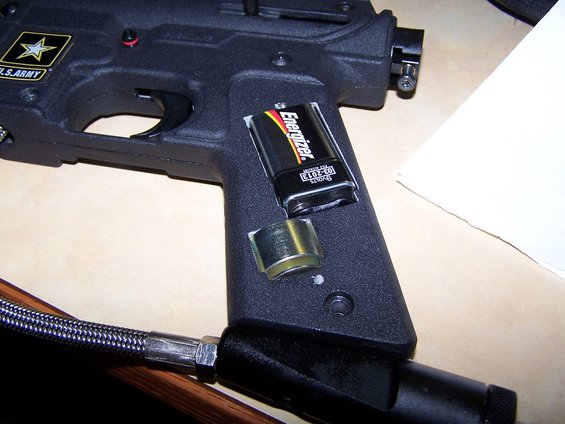 Hold the power button and for 3 seconds to turn the unit on. The E-trigger will default to semi-auto. Each click of the button will cycle you through the various modes. One flash = Semi-auto, Two Flashes = 3 shot burst, Three Flashes = Full Auto Normal (12 balls per second after initial 4th pull of trigger) and Four flashes = Full Auto Fast (15 balls per second after initial 4th pull of trigger). I hope this helps someone on the forum!
|
Replies:
Posted By: Monk
Date Posted: 11 March 2009 at 6:59pm
|
Nice, very nice. This cracks me up though. There had to be a guide to installing a 98c electro for m98, and now there is one using 98c electro for a later model. 98c pwns all. |
Posted By: AQucsaiJr
Date Posted: 28 April 2009 at 10:38am
|
When you buy the E-Grip for the Alpha... It comes with instructions... But seeing these pics during the process helps out.
------------- Be the artist not the portrait! |
Posted By: Syclops
Date Posted: 28 April 2009 at 11:56am
For most...pictures are worth a thousand words.
|
Posted By: alphablack
Date Posted: 06 July 2009 at 5:35pm
| this would have been nice a while ago i fryed my the first time |
Posted By: UnitedSeal
Date Posted: 03 August 2009 at 12:14pm
| Does this apply for the Army Project Salvo ? |
Posted By: greengoblin
Date Posted: 16 August 2009 at 3:27pm
| Thanks for the help. The instructions that come with the e grip are not all that great. I couldn't get it to fire correctly until this post. Thanks now it fires perfect. |
Posted By: atver13
Date Posted: 28 November 2009 at 9:12pm
| how did you cut out the piece for the battery? |
Posted By: hardkore_360
Date Posted: 07 January 2010 at 9:24pm
|
Hi there, New to the forums and just wand to ask a quick question, could you measure the capacitor when you open up your marker for cleanup or if you already have an extra e-trigger handy and out of the marker? Capacitor unfortunately busted up and need to replace, HOWEVER im not at home at the moment and left my notes in my apartment. Wanna buy online and install when I get home ASAP. Thanks! Length and thickness should do, found two possible candidates but dont wanna buy the one that is too large. |
Posted By: hardkore_360
Date Posted: 07 January 2010 at 9:27pm
|
I used a flat head screw driver on the corners and just tapped it with my hand and it pops right out, the metal is already indented so its pretty easy to come off in 1 big piece. I then just lightly hand sanded the cut out on the marker to smooth it out and make it too many pretties :-) Hope that helps. |
Posted By: TinMan
Date Posted: 07 January 2010 at 10:05pm
|
I have 20 capacitors. PM me your address and I'll send you one. |
Posted By: j0v1
Date Posted: 19 March 2010 at 5:27pm
|
Can Tell me how to install a response trigger on a 98 custom? PLz Thanks lol |
Posted By: hulskin
Date Posted: 10 August 2010 at 1:27pm
the same trigger I can use it in a bravo one tactical? |
Posted By: oldpbnoob
Date Posted: 11 August 2010 at 7:08pm
------------- "When I grow up I want to marry a rich man and live in a condor next to the beach" -- My 7yr old daughter. |
Posted By: Chrisantoni3
Date Posted: 05 April 2011 at 4:15pm
|
Yeah I would also like to know this because i was considering to buy the etrigger for my Salvo ------------- If your not bleeding at the end of a paintball game, your not playing hard enough. |
Posted By: headshot611
Date Posted: 16 July 2011 at 7:20pm
| does it matter what type of battery you use? |
Posted By: ldsguy1
Date Posted: 16 January 2012 at 6:56pm
|
HELP!! i accidently bought a Tippmann A-5 e-grip without realizing it. is there some way i can take out the parts in order for it to work on my Tippmann 98 Custom? please help!!!!!!
|
Posted By: oldpbnoob
Date Posted: 16 January 2012 at 7:04pm
------------- "When I grow up I want to marry a rich man and live in a condor next to the beach" -- My 7yr old daughter. |
Posted By: ldsguy1
Date Posted: 16 January 2012 at 7:30pm
|
well that sucks. i took it apart and looked at the stuff. it looks right, but maybe too small? |
Posted By: ldsguy1
Date Posted: 16 January 2012 at 8:13pm
|
i guess my question is "why exactly won't it work" i bought it off of craigslist for $40 (its in the grip form). will it not work if i just disassemble it, take all the electronics out, and reinstall it into my 98 custom? it looks like it will fit, but i don't want to mess it up.
|
Posted By: firemanbif
Date Posted: 02 March 2012 at 5:49pm
| Ok so I bought the Tacamo MK98 kit for my alpha black. I am switching the egrip into it and the actuator rod is too long. I need to cut. But its about an inch off. Anyone know a good way to do this? It seems to be a pretty hard aluminum |
Posted By: The Guy
Date Posted: 02 March 2012 at 9:05pm
|
You bought the wrong kit. the MK98 kit is for the model 98. You wanted the MKV kit. ------------- http://www.anomationanodizing.com - My Site 
|
Posted By: lordofthewraith
Date Posted: 01 June 2012 at 1:31pm
| I installed my E-grip but I seem to have a problem with the battery. It sticks out far enough from the handle that it causes the two halves of the grips to close together. Any thoughts or help? |
Posted By: danno52000
Date Posted: 27 March 2020 at 4:32pm
|
awesome job! ------------- http://www.paintballspace.com" rel="nofollow - http://www.paintballspace.com |
 AQucsaiJr wrote: