
|
Uber Upgrades & FAQ: Please Read! |
Post Reply 
|
Page <1 2345> |
| Author | ||
^Pirate^ 
Gold Member 

Joined: 12 June 2005 Status: Offline Points: 1891 |
 Post Options Post Options
") Thanks(0) Thanks(0)
 Quote Reply Quote Reply
 Posted: 11 July 2005 at 7:46am Posted: 11 July 2005 at 7:46am |
|
|
On all the forums I've been on someone is ALWAYS complaining abou how heavy their M98 or 98c or Custom Pro is so here....
Super light 98! To make a super light 98 you need to drill 17 - 3/8" holes in the grip handle. Then ground out any unnecessary lugs or excess material in the grip, and around the vertical adapter. I took my dial venier calipers and measured around all the seams and ground out all thick lips and made the seams the same thickness all around the inside. i ground away half of the slot where the linkage rod slides. the pistol grip is about 1/8" smaller (my stickys just slide on now). both front and rear sights can be comletely gone(Only if you centerfeed for the front!). How to shorten your cocking stroke for better efficiency... Take out the o-ring that the hammer hits on the return cocking stroke and put in 3 rubber washers ( that shortened the stroke approx. .150") then I shortened the rear bolt (hammer) .025 of an inch. i also filled in the slot in the sear so it dosen't slide it just piviots. that took .100 of an inch off the hammer travel. i put a trigger stop in but it takes out the trigger slop before you pull(my trigger has approx. .010" travel before it trips the sear, and only about 1/8" total travel). both sight dovetails are gone and i have a ccm spyder clamping center feed neck. i used "Quick Steel" to fill in the cocking slot and to make the mounting surface for the center feed. the stock hammer from the full boar rear cocking system is lighter than the tippmann hammer, but I turned mine down .010 of an inch (not much weight taken off) but it never rubs on the inside if the receivers - less drag. Then use the maddman green spring. This works excellently, it was told to me ekim98. I did it and I love it! Disclaimer: No one here is responsible for the ruining of your marker should you ruin it, besides yourself, I do NOT recommend this if you have no clue what your doing, have a father or machinist help you if need-be. EDIT: Upsized the font so it was easier to read. Edited by ^Pirate^ |
||

It aint about black or white becuz we human I hope we see the light before it's ruined My ghetto gospel |
||
 |
||
|
A5 Man
Member 

Guested - F-bomb Joined: 10 July 2005 Location: United States Status: Offline Points: 145 |
Post Options
Thanks(0)
Quote Reply
Posted: 17 July 2005 at 4:16am |
|
|
Paint the Town Red
Paintballs have an incredibly simple construction. They're actually a lot like gel-cap pills, or bath-oil beads. They consist of a glob of colored liquid encased in a gelatin capsule. The "paint," which comes in many colors, is non-toxic, biodegradable and water soluble (so it will wash off skin and clothing). Basically, a paintball is like a small water balloon, weighing only a few grams and measuring only 0.68 inches (1.7 cm) in diameter. The capsule holds up if you handle it or drop it from a short distance. When you shoot a paintball from a gun, however, it bursts on impact and leaves a 6-inch (13-cm) splatter of paint. The job of the paintball gun, sometimes called a marker, is to get the paintball moving at a high rate of speed. In the basic gun, the propulsion system is compressed gas. This gas, which can be compressed carbon dioxide (CO2), nitrogen (N2) or ordinary air, is stored in small cartridges or larger tanks that can be attached to the gun. The gun is also attached to a hopper, which holds the paintballs.
Different guns have different firing systems, but the basic idea in all of them is the same. The gun is cocked in some way so that a paintball can fall out of the hopper and enter the gun's barrel. Then a small burst of compressed gas is released into the barrel, just behind the paintball. The compressed gas pushes the paintball from behind with much greater force than the air on the other side of the paintball, so the paintball is propelled forward. In order to make the game safe, the power of paintball guns is strictly regulated. Guns in play are adjusted so that the top speed of the fired paintball is 300 feet (91 m) per second. A paintball moving at this speed is unlikely to cause serious injury if it hits your skin, though it will sting and may leave a bruise. Also, since wind resistance starts slowing the paintball down as soon as it leaves the gun, it has a reduced impact when fired from a greater distance. Speeding paintballs can cause serious injury to the eyes or ears, so paintball players always wear head protection. The relatively slow projectile speed significantly limits the range of paintball fire: The paintball will fall to the ground in a much shorter distance than a faster projectile, such as a bullet. For this reason, firing a paintball gun is a sort of hybrid between firing a gun and throwing a ball. To hit somebody at a distance, the shooter has to tilt the gun up a little bit, so the paintball flies up in the air in an arc, like a football, and comes down on the target. There are a variety of gun designs on the market, each with a slightly different system, but they are all based on the same principles. In the next section, we'll find out how guns generally work by examining the specific mechanism in a basic "pump" gun, a design that dominated paintball in the game's early days. |
||
|
||
|
WKS_weiner
Member
Joined: 21 March 2005 Location: United States Status: Offline Points: 784 |
Post Options
Thanks(0)
Quote Reply
Posted: 21 July 2005 at 12:13am |
|
|
There are two ways to polish the internals of a 98c. one way is to use
steel wool... 
it cost about $2. you can find it at any hardware store. but make sure you get the right kind.... 
...make sure you get #000. as shown in this pic. you don't wan't to messup your gun or anything. first step... 
take apart your gun. remove all the inernals. then clean up all the gun oil that is on the left and right receivers.. 
...when you start polishing the receviers... 
....the best place's to start are the, back and front bolt areas, in the area were the linkage arm moves Around, in the area were the sear moves around and any other place you feel like. just remember to polish the same areas on both recivers. also when you use steel wool to polish the 98c i may get alittle messy. so when your done wash off both recerviers with running water and dry throughly. make sure no left over steel wool is on both receivers. if there is this will cause major problems. when done washing and drying put gun back together and you are done.this will help your 98c in the long run... the other way is to use a dremel tool. i don't have one yet so if someone has one please post how to on this thread, thank you. using steel wool is the cheapest way to polish the internals but not the easiest way. also if you own an a-5 you can polish your internals also the same way you can a 98c. |
||
 Always Bite the Hand Always Bite the Hand 
|
||
|
||
|
WKS_weiner
Member
Joined: 21 March 2005 Location: United States Status: Offline Points: 784 |
Post Options
Thanks(0)
Quote Reply
Posted: 21 July 2005 at 12:16am |
|
|
There has been many people wanting to know how to make their
mehanical triggers walk-able, so I decided that I'm up to the task to put together an article that has it all. Step 1: This is for those people that still have single triggers. You're not going to be able to walk a single trigger, so first we need to make a double. This can be easily dont by cutting off the bottom where it starts to bend, drilling a small hole up through the middle, and glueing something round up there. One easy thing to use is a hex key. Be carefull when doing this because if the hole is too small then you can crack the trigger. After you are finished drilling it, find a allen wrench that fis snug, but so you can get it up there. (god that sounds stupid) Use either epoxy or JB Weld to glue it in, then measure for length and cut off the part where it bends. Me and RedBull both did this and currently use it on our setups. In fact I had a GTA double and sold it after using this. 
Step 2: If you already have a double trigger then the first thing that we are going to do is get rid of the slop in the pull. This can be done easily by finding a drill bit with a diameter of .1285 inches, or if you cant tell, one that fits more snug into the pin hole in the trigger. You want to put this in the front one from which the trigger pivots on. This will make it less wobbly, and shorter in some cases. Step 3: The next thing that we are going to do is go ahead and make a rear trigger stop. This will get rid of all the excess pull after the sear is engaged. There are a few ways to do these and I will start off with the rear. (hehe) This can be done by tapping the R/T hole, and putting a screw in there. The right size tap for this hole is a 1/4-20, and then you need a 1/4 20 threaded bolt. You can either put the head inside or outside. If it is outside then it will be easier to adjust, but if it is inside then it will look nicer. It is up to the user. Or you can use your single trigger guard. To use your single trigger guard, cut it near the end where it goes into the bottom of the trigger. You can now do a few things, either A- just file it down and do not use any screw, just use the plastic. B- File it down until it is flush, drill out a hole and tap it using a set screw (recommended 5/16, with 4-40 tap), or C- do the same as "B" but use a regular screw. Either way will be fine. Step 4: Now we are going to make a front trigger stop. This will help to shorten your pre trigger pull. There area few ways to do this. The "best" way to do this is to drill a hole through the part of your trigger where the spring rests. Then you can tap it and put a set screw in there and have it fully adjustable. You can even go another step and drill a a small hole in the bottom of the gun to make it adjustable from the outside. Another way to do this (or if your lazy) is to apply some duck tape or something on the power tube between that and the trigger. I highly do not recommend this because it is not very good cosmetic wise, and it is a pain to adjust by layering tape. Here is a few pics of some Evil triggers that have set-screws... 
Step 5: The next thing to do is to polish the recievers where the trigger moves on. This helps to get rid of the powdercoat and it will make your pull smoother and possibly lighter. This can be done either with a dremel and buffing wheel, or steel wool. With either application you should use mothers or some other polish. 
Step 6: The next thing to do is to change some springs. I suggest either getting rid of your trigger spring, or replacing it with a pen spring. It will work fine with no spring because the sear will reset it, but if you dont want it flopping around when you have no air in it, and it is not cocked, then go ahead and throw one in. Another thing that you can do, but I don't necessarely reccomend is to put an extra link in your sear spring. This will make the sear lighter and and in turn the trigger pull. If you do this wrong though it can lead to double firing, so only do this if you have a good understanding of the gun. Another thing that you can do, but I certainly do not recommend is replacing your sear spring with orthodontic rubber bands. These wear out and can lead to double firing. Some people swear by this mod though so try it out and see if you like it. The last spring that can be changed is the drive spring. You can either replace it with the green one from the maddman kit, or the lpk rear cocking apparatus. Either will lessen the weight put onto the sear, making it easier to trip. 
Step 7: Practice, practice, practice... Practice, and more practice.. There ya go NN... This should make your trigger pull very nice, and if done right, probably walk-able. I take no responsibility if you ruin any part of your gun by doing any of these mods. Thanks to Evil-98 for letting me use his picture.. And NN and _m98_ for their hel ....i found this, i didn't write this. |
||
|
Always Bite the Hand
|
||
|
||
|
TuF^yoda
Member

Joined: 05 August 2005 Location: United States Status: Offline Points: 17 |
Post Options
Thanks(0)
Quote Reply
Posted: 05 August 2005 at 9:07pm |
|
|
this website is the BEST website for true woodsballers if you play speedball dont click http://www.specopspaintball.com/ some stuff might be a little pricey but its top of the line stuff and that double trigger is GHETTO go now you know you want to Edited by TuF^yoda |
||
|
Peace through superior firepower!
|
||
|
||
|
Frobs
Member
Joined: 21 June 2004 Location: United States Status: Offline Points: 716 |
Post Options
Thanks(0)
Quote Reply
Posted: 19 August 2005 at 8:31pm |
|
|
You are now going to learn how to relocate a 9 volt battery for your ebolt into your foregrip
Edited by Frobs - 30 June 2006 at 3:09pm |
||
|
||
|
evil_fingers
Platinum Member 

Strike 1 - Inappropriate sig Joined: 27 March 2004 Location: Frisco Nor Cal Status: Offline Points: 7224 |
Post Options
Thanks(0)
Quote Reply
Posted: 05 October 2005 at 8:06am |
|
Thats an awesome idea Frobs, can that be done wit the Custom Pro E? If so, how does one run the wires to the trigger? |
||
|
Do not steal....the government hates competition!

|
||
|
||
|
A-5_massacre
Member

Strike 2 - Flaming, Spam Joined: 05 October 2005 Location: United States Status: Offline Points: 58 |
Post Options
Thanks(0)
Quote Reply
Posted: 07 October 2005 at 1:50am |
|
|
All you really have to do is put the battery in the forgrip and close it back up. Make sure you have wiring that connects to the E-Grip.
|
||
|
||
|
Frobs
Member
Joined: 21 June 2004 Location: United States Status: Offline Points: 716 |
Post Options
Thanks(0)
Quote Reply
Posted: 10 October 2005 at 11:00am |
|
|
your gunna have to mill a little trench through the recievers. once you get access to the hle the vertical adapters copper hosing goes through its all done. im sure it would work with the custom pro's battery, though i dont see a need to do so seings its already contained inside the gripframe.
no, it does involve sanding plastic out of the foregrips, you cant just throw a battey in and close it up. it wouldnt fit |
||
|
||
|
darkstalker
Member

Joined: 15 October 2005 Location: Canada Status: Offline Points: 1 |
Post Options
Thanks(0)
Quote Reply
Posted: 15 October 2005 at 6:22pm |
|
just wondering but would this set up work with an response trigger set up 
|
||
|
mess wit the best get shot in the throat like all the rest
|
||
|
||
|
zeitlinh
Member

Joined: 01 February 2006 Status: Offline Points: 63 |
Post Options
Thanks(0)
Quote Reply
Posted: 01 February 2006 at 9:22pm |
|
|
i think CP is a great barrel brand. get a black 12 inch
|
||
|
||
|
XArmy
Member

Joined: 24 January 2006 Location: United States Status: Offline Points: 72 |
Post Options
Thanks(0)
Quote Reply
Posted: 02 February 2006 at 11:54pm |
|
|
----------SUPER RT---------- I hope this helps make it easier to understand what you need and where to get them... (Besides lying to Tippmann about having a LPK...)
(12") 1/8" hose This way requires you to change out the barb on your control valve... You run the risk of ruining your valve all together...
1/8 hose (only sold in 50' rolls) part# URH1-0804-BKS-050 (solid black)
Palmer QEV part# PNEU053 (it's called QEV 10-32 Swivel Lock) The OPTIONAL parts for this mod are a new flow control valve that you can adjust with your fingers and an "L" fitting to change the direction of the control valve (so it doesn't stick out the side of your gun a mile)... here are the Clippard part #'s control valve part# MFC-3AK2
Edited by XArmy - 10 February 2006 at 4:25pm |
||
|
||
|
MoNkeY Hunter
Member

Joined: 21 July 2005 Location: United States Status: Offline Points: 766 |
Post Options
Thanks(0)
Quote Reply
Posted: 01 March 2006 at 9:02pm |
|
|
HOW TO MAKE 98 FASTER,RUN SMOOTHER,AND A LITTLE BIT USER FRIENDLY. Ok lets get started, this is a post on how to get you stock or near stock model 98 faster,and overall more efficient. 1. You will need to polish your internals of your gun. 2. Then replace your buffer Oring with a with a garden hose washer. This will stop the bolt from slaming back and fourth a bit and increase cycle rate by reseting the sear faster by less bolt over travel. 3. Remove the second trigger pin so that it swings freely on olny the first pin. 4. Remove and replace the trigger spring, the one behind the peice of metal that comes in contact with the sear, with something solid and won't move out of place when the pin that holds the metal thing on is put back in place. By doing this, it will give you a mini RT in a sense, decreasing trigger pull weight and giving you more speed. "I used a cut in half airsoft bb for the replacement of the spring." 5. Remove the accual trigger spring. 6. Put a oring on the base of your eblow to keep it from rattling. 7. Replace your front bolt Oring with a tank Oring, this will stop most blow back gases so your hopper will feed a bit better. 8. This is optional but can make your gun a little bit lighter, simply pop out the metal panles behind the grips and if you want do some milling to make your gun custom. 9. Gas it up and see how it shoots, ajustments can be made and you may have to tinker a bit but its IMO worth it. I did this to my other 98c and can get 8-10 BPS out of my stock tippmann. Thats good if I say so myself. My trigger pull is short,has little slop, and rather light. Remember, practice,practice,and practice. So there ya go a fairly good way to make your 98 a little better then the rest. . NOTE- I AM NOT RESPONSIBLE FOR ANY DAMAGE YOU DO TO YOUR GUN!
Edited by MoNkeY Hunter - 10 March 2006 at 7:44pm |
||
|
||
|
RavenGuard
Gold Member

Joined: 31 October 2005 Location: Canada Status: Offline Points: 1861 |
Post Options
Thanks(0)
Quote Reply
Posted: 02 April 2006 at 11:48am |
|
|
IN DEPTH SUPER R/T + QEV TUTORIAL
If you are like me, you thought the super r/t would be an easy mod. You call Tippmann, they send you the parts, you put them on. Once you get them, you realize you don't have exactly what you need to properly connect everything. Here I will show you the easiest way to complete a full Super R/T and QEV setup. First off, what is the logic behind the Super R/T? By changing the hoselines and connectors from 1/16" to 1/8", you greatly increase the airflow to the R/T. This in turn gives the R/T the ability to cycle faster, and will in most cases allow a rate of fire of 20 balls per second, sometimes more. Some of you woodsballers may say that is useless, but it is not the only use for the Super R/T. The larger hoses actually allow the user to hold the sweetspot of the R/T much easier, and for greater periods of time. This means you will more than likely be able to maintain an almost effortless 12-15 bps, maybe higher depending on your tolerance. Remember, the R/T doesn't just have to be tuned for speed. The next question to clear up is how does the QEV affect the cyclone system? When the stock cyclone cycles with the marker, air is forced into the chamber attached to the feeder and it cocks the cyclone, after the paintball has left the barrel and pressure is released, the cyclone is triggered and uncocks, spinning it and loading a new ball. The air that was in the cyclone is forced back into the body of the marker. By adding a QEV, the air is allowed to escape directly out the end of the cyclone, allowing it to cycle faster. You need to understand that the cyclone does not spin when pressure is applied, but when pressure is released. You can see this yourself by pushing the manual button. On to the fun part! What You Will Need: -1/8" Flow Control Adjuster (10/32 threading)* -Banjo "T" Fitting (or regular Banjo Fitting without cyclone)* -1/8" ID Line (gun to adjuster)* -Clippard MEV (or QEV of your choice) -Pack of 1/8" barbs -1/8" ID Line (gun to QEV) *Parts provided by Tippmann Step 1: Notice the difference. Here are the standard fittings and hoselines (1/16"): 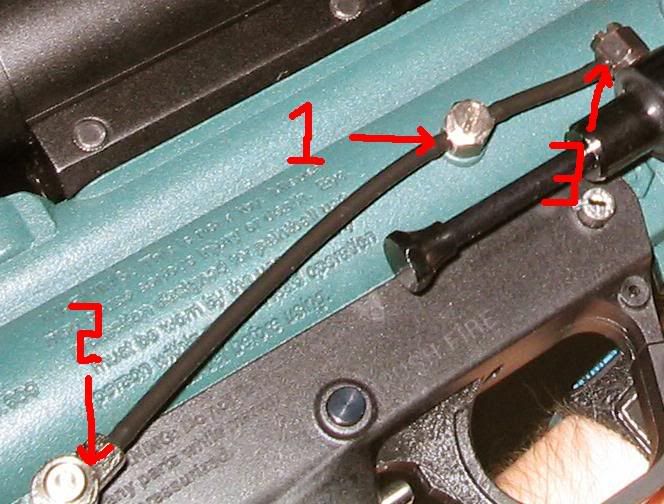 1.) 1/16" Banjo "T" (10/32 threading) 2.) 1/16" Flow Control Adjuster (10/32 threading) 3.) 1/16" Banjo (10/32 threading) Step 2: Preparing to install. Befor installing the parts onto the actual marker, there are a few things to connect and mess around with. First, you should connect the 1/8" adjuster fitting to the Banjo "T" fitting using an appropriately sized ID hoseline (all provided by Tippmann). Make sure to connect both fittings with the threading facing the same way. The QEV: The QEV has no way to attach to the hoseline, so a barb must first be attached. Screw a single 1/8" barb into the "Input" side of the QEV. Now, you may hold the QEV near to the marker to determine the exact size of ID hose you must cut to attach the QEV to the Banjo "T". After you have cut the proper length hose, attach it to the Banjo "T" with the threading of the "T" facing left and the threading of the QEV facing down. Installing the Super R/T: Now you will want to attach these parts to the actual marker. Befor attaching the QEV, you may want to note that it will be facing the wrong direction when properly secured. To solve this problem, many people file down the cyclone for it to fit properly, but I simply removed o-rings from the extra barbs (it comes in a pack of 5) and put them onto the QEV until it would secure in the proper direction. Be sure to add a small amount of oil if you are doing this. Now, simply make sure the stock fittings are removed, and secure the QEV, as well as attach both the rear adjuster and the Banjo "T". This is what the setup should look like: 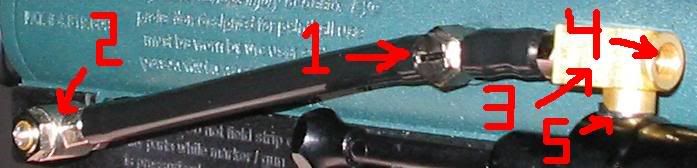 1.) 1/8" Banjo "T" fitting (10/32 threading) 2.) 1/8" Flow Control Adjuster (10/32 threading) 3.) QEV 4.) Exaust side of QEV 5.) O-rings Here it is from a different angle: 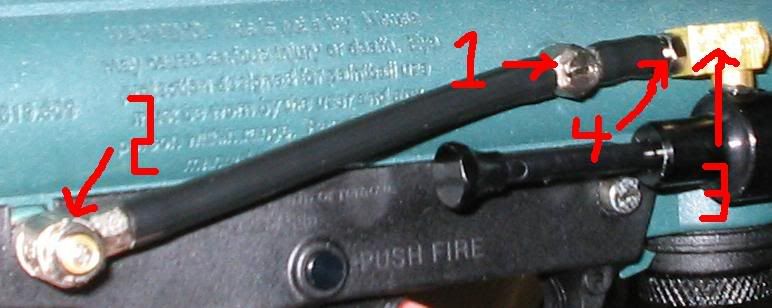 1.) 1/8" Banjo "T" fitting (10/32 threading) 2.) 1/8" Flow Control Adjuster (10/32 threading) 3.) QEV 4.) 1/8" Barb fitting Now you are essentially done the Super R/T + QEV mod on your A-5 or 98. If you would prefer to find a Clippard parts dealer rather than purchase these parts over the internet (to avoid shipping etc.) do as follows: 1.) Go HERE 2.) Select your country. 3.) Enter other information it asks for (zip/postal etc.) 4.) Scroll down, and information on the nearest dealer will be displayed. Now go get it tuned, and have some fun! |
||
|
Tippmann A-5
Polished Internals E-Grip Ape Board JCS Blade Trigger QEV 8" Bigshot + Apex Ricochet R-5 / Tac Cap Palmers Stabilizer 68/4500 Crossfire |
||
|
||
|
daveb333
Member

Strike 1 - Language & Attitude 6/10 Joined: 09 January 2006 Location: United States Status: Offline Points: 80 |
Post Options
Thanks(0)
Quote Reply
Posted: 06 April 2006 at 11:22pm |
|
|
You said "A longer barrel will not increase accuracy." This is a BS statement. If this was true, why would tippmann themselves make a 12", 14" and 16" barrel if they all did the same thing???? |
||
|
DjB
|
||
|
||
|
MoNkeY Hunter
Member
Joined: 21 July 2005 Location: United States Status: Offline Points: 766 |
Post Options
Thanks(0)
Quote Reply
Posted: 10 April 2006 at 10:26pm |
|
|
^ Wrong place to post!! And you are WRONG. Tippmann sells barrels in different lenghs because some people like longer/shorter barrels. Its all depends on the player. YOU ARE WRONG!!!
|
||
|
||
|
darkmaster
Member

Joined: 09 October 2005 Location: Canada Status: Offline Points: 121 |
Post Options
Thanks(0)
Quote Reply
Posted: 18 April 2006 at 7:40pm |
|
|
daveb333 said: You said "A longer barrel will not increase accuracy." This is a BS statement. If this was true, why would tippmann themselves make a 12", 14" and 16" barrel if they all did the same thing????
daveb333, You have no clue what he is talking about! on a barrel kit there is a front and back section and they join together so you can have one barrel kit and match size with any paint size (remember about different paint sizes? lol). he is refering to the length of the back portion in relation to the front. And as for your idea that a longer barrel will impart more momentum on the ball,WOW, the momentum of the ball is a factor of velocity of the ball times mass of the ball divided by drag and friction. every ball of the same mass traveling at the same velocity will have the exact same parrabolic arc regardless of barrel length. The only way you can get more distance from a barrel is if it imparts backspin on the ball thus counter acting the effects of gravity and flatening out the parabolic arc just like a golf ball. With a conventional barrel the only way to flaten the parabolic arc is to increase one of the variables namely velocity but then you will be shooting faster then is safe and you will hurt people. For somone who has such a weak grasp of the sport and the physics behind it you sure like to mouth off and tell everyone how dumb they are and how you are the captain of your high school team. You need to stop being so rude to people so i can stop being rude to you. |
||
|
Dopa mi la tempesta
(After me, The storm) |
||
|
||
|
Frobs
Member
Joined: 21 June 2004 Location: United States Status: Offline Points: 716 |
Post Options
Thanks(0)
Quote Reply
Posted: 23 June 2006 at 5:47pm |
|
|
Nearly a year later, i edited the battery relocation into the foregrip mod to include instructions on how to run the wire
|
||
|
||
|
deadeyevt
Member
Joined: 26 May 2006 Status: Offline Points: 105 |
Post Options
Thanks(0)
Quote Reply
Posted: 30 June 2006 at 9:43pm |
|
|
Hey, I stole this from tyler t over at PCOG. It's a good explaination that should put the longer barrel conflict to rest.
Length is a common missconception. People think that a longer barrel will be more accurate, that is not correct. Longer barrels help on firearms because the longer the barrel the higher the velocity (FPS) the bullet travels. In painbtall no matter what the barrel length we adjust the velocity to 300 FPS (feet per second). For a good paintball barrel length you just need enough lenth for the gas to expand and get the ball going 300 fps. Ideal length is 8-12 inches. Anything over around 12 inches will make a drop in your FPS (compared to a 8-12 inch barrel) and require you to turn your velocity up (requiring more air). A longer barrel also increases the chances of a ball breaking in the barrel. A barrel shorter than around 8 inches will require more gas also because by the time the ball leaves the barrel the gas wont have had enough time to expand behind it, this requires you to turn up your velocity (using more air). It also increases the chances of breaking a ball because you have to have more air hitting the ball at once to make up for the lack of time for the gas to expand in the barrel so the intial harder "smack" could break balls. |
||
|
||
|
FA22RaptorF22
Member

Joined: 23 April 2005 Location: United States Status: Offline Points: 313 |
Post Options
Thanks(0)
Quote Reply
Posted: 30 June 2006 at 9:49pm |
|
|
^^^^Noice. I personally like 14's. They are a comprimise. Ive used 12's and 14's. The 14 have a smaller shot grouping at the same velocity.
|
||
|
Please sign up at http://www.tippmannowners.com/ and leave the referrer as me (FA22RaptorF22)and you will be my hero.
|
||
|
||
|
Post Reply
|
Page <1 2345> |
 Tweet
Tweet
|
| Forum Jump | Forum Permissions You cannot post new topics in this forum You cannot reply to topics in this forum You cannot delete your posts in this forum You cannot edit your posts in this forum You cannot create polls in this forum You cannot vote in polls in this forum |


 Topic Options


 Frobs wrote: